Important Information
- Macintosh (Mac) must use this procedure to run a report in M-Pathways. Windows users can follow this procedure, or they can refer to the Run a Report to a Window in M-Pathways procedure in My LINC (https://maislinc.umich.edu) to use fewer steps to run a report to a window.
- This procedure assumes that you have an existing Run Control ID. See the M-Pathways Run Control ID Information reference document in My LINC if you want to create a specific Run Control ID for a report.
- The Report Manager stores the reports you run (or that another user distributes to you) for 60 days in the Financials systems and 99 days in the SA/HRMS systems. You can retrieve and print a report from the Report Manager any time after it is run. See the M-Pathways Report Manager Field Descriptions document in My LINC for additional information about using the Report Manager.
- The PDF (Portable Document Format) process format allows viewing of reports online. Although the report data cannot be manipulated, the PDF versions of some reports are designed to make it easier to interpret complex report data.
- The CSV (Comma Separated Value) or XLS (Excel) process formats can be selected if data needs to be manipulated after the report is run. The process type determines which of these format options is available for exporting the report data into Excel. Some reports do not translate clearly into CSV or XLS formats. This is due to the complexity of some report data, specifically with headings and column formatting.
- If the system doesn't display the report in a window, verify your web browser settings.
Navigation
The navigation path is different for each report. The Leave Activity by Department report is used as an example for this procedure.
Step-by-Step Process
Select a Run Control ID
- Click Search to display your existing Run Control ID(s).
- If applicable, select a Run Control ID from the Search Results list and skip to step 6.
Add a Run Control ID
- If a Run Control ID does not display, click the Add a New Value tab or link.
- Enter a name for the new Run Control ID.
Note: You can use letters, numbers, and underscores to name a Run Control ID, but you cannot use spaces, dashes, or other non-alphanumeric characters.
- Click Add.
Enter Parameters and Run Report
- Confirm or type the parameters for the report (e.g., Date parameters, Department value, etc.).
View Parameter Page screenshot
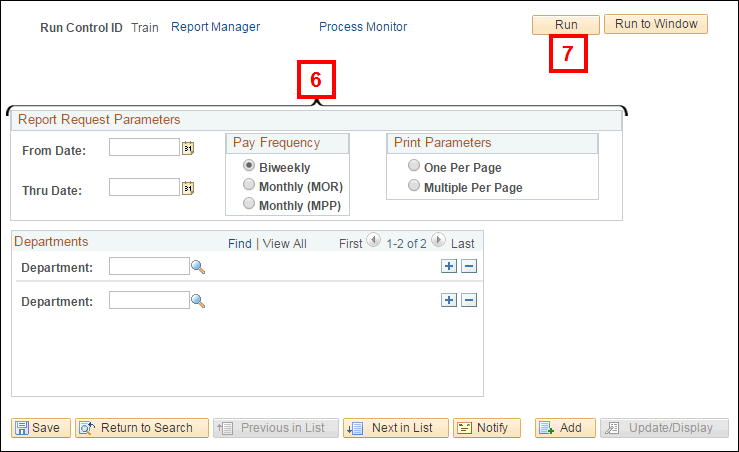
- Click Run.
Note:The Process Scheduler Request page displays.
- Select the appropriate value from the drop-down list in the Server Name field based on the Process Type for the report:
- PSUNX for SQR reports
- PSNT for Crystal reports
View Process Scheduler Request Page screenshot
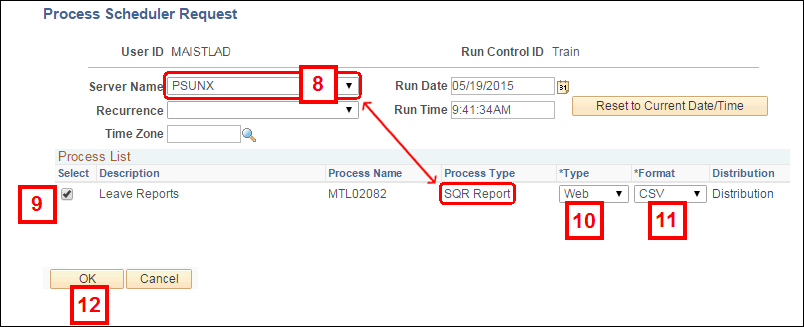
- Select the report(s) you want to run:
- If one report is listed, check the Select checkbox to select the report.
- If more than one version of the report is listed, check the Select checkbox(es) for each option you want to run.
- If the report needs to be run in a batch process, click the link in the description column.
- Select Web from the Type drop-down list
- Select the appropriate format type from the drop-down list in the Format field:
- PDF – to view and print the report
- CSV – to run SQR reports to Excel
- XLS – to run Crystal reports to Excel
- Click OK.
Note: You are returned to the Process Scheduler Request page of the report.
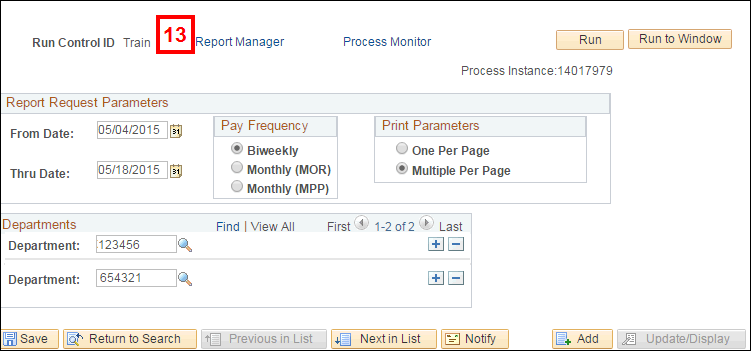
- Click Report Manager
View Process Scheduler Request Page screenshot
- Click the Administration tab.
View Report Manager Page screenshot
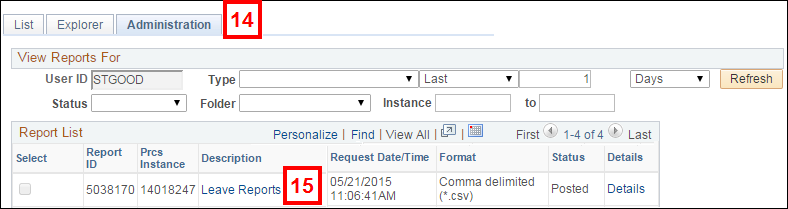
- Click the link in the Description field for the report (e.g., Leave Reports) to open the CSV data in Excel.