Overview
To upload a Bill into M-Pathways, complete the following:
Download the Billing Upload Template
Download the Billing Upload Template from the Shared Services Center (SSC) webpage. It is recommended that you download an updated version of the template periodically.
- Click Save.
- Save the template file (AR_BU_BillingUPload.xlsm) to your computer.
Complete the Billing Upload Template
- Do not re-format any columns.
- Leave unused fields in the spreadsheet blank. Do not enter
none
orN/A.
- Credit memo billing is handled using this Billing File. In the following procedure, any changes that need to be made when entering a credit memo are listed.
- Enter the full value in a field, including any leading zeros (e.g., Short Code). Leading zeros are necessary for the value to be loaded correctly into M-Pathways.
- See the Instructions tab within the spreadsheet for complete information about the data fields in the spreadsheet, including usage information.
- Field names that are bold in the spreadsheet are required.
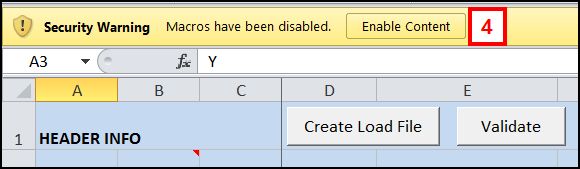
- Open the Billing Upload Excel File (AR_BU_BillingUpload.xlsm) from the location where you stored it on your computer.
- Click Enable Content.
Billing Upload Excel File Screenshot
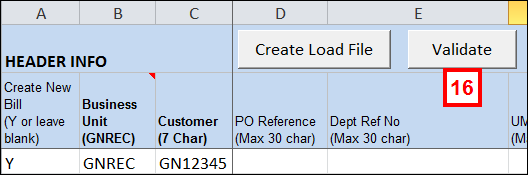
- Verify Y displays in the Create New Bill field, or leave blank.
Notes:
- Y in the Create New Bill field indicates the start of a new invoice.
- Leaving the Create New Bill field blank will make the new line a part of the invoice above it.
Billing Upload Excel File Screenshot
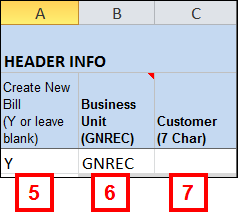
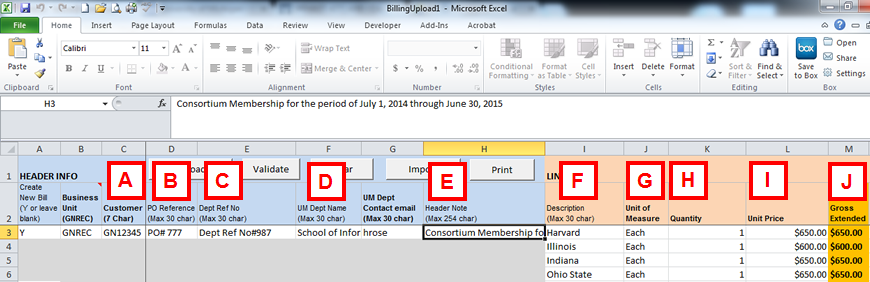
- Verify GNREC displays in the Business Unit field.
- Enter the applicable number in the Customer field.
Note: Refer to Create the General Customer Upload File to create a new customer number.
- Enter the department contact's uniqname in the UM Dept Contact email field.
Notes:
- Do not enter @umich.edu
- The following fields are optional (except if a credit memo is being prepared):
- PO Reference - If a credit memo is being prepared, list the letters CM in this field.
- Dept Ref No
- UM Dept Name
- Header Note
Billing Upload Excel File Screenshot

- Select the applicable value from the Unit of Measure drop-down list.
Billing Upload Excel File Screenshot

- Enter the applicable bill line information in the Quantity field.
- Enter the applicable bill line information in the Unit Price field. If this is a credit memo, the unit price should be negative.
Note: The following fields are optional:
- Description - For a credit memo, please enter CM invoice xxxxxx (the x denotes the invoice number that is being credited).
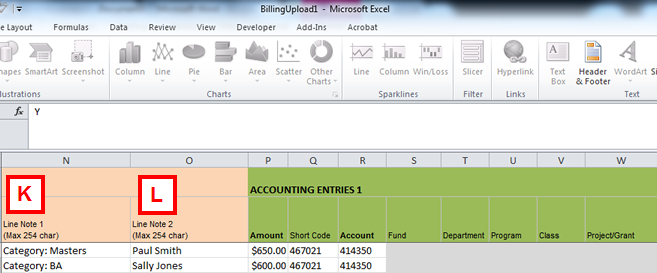
- Line Note 1
- Line Note 2
- The Gross Extended field will populate based on the information from the Quantity and Unit Price fields.
- Verify the pre-populated value displayed is correct OR to split revenue between departments, enter the applicable bill line information in the Amount field.
Billing Upload Excel File Screenshot
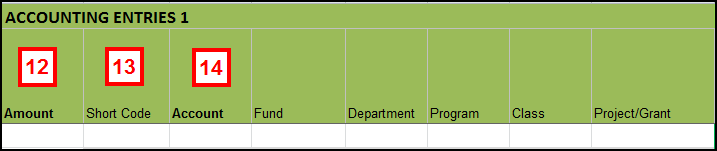
- Enter the applicable bill line information in the Short Code field OR the following fields:
- Fund
- Department
- Program
- Class
- Project/Grant
- Enter the applicable bill line information in the Account field.
- To split revenue between departments, enter the applicable bill line information in the Accounting Entries 2 section. If revenue is not split, leave blank.
Note: Repeat steps 5-15 for each bill line.
Important Information
Validate/Save/Print the Billing Upload File
- Click Validate.
Note:
- If no errors are found, go to step 17.
- If errors are found, go to step 18.
Billing Upload Excel File Screenshot
- Click OK and go to step 21.
- Click OK.
- Review the Error Description(s).

- Click Cell Address link(s) to go directly to cell(s) with errors.
Note: After correcting all errors, return to step 16.
- Click File.
- Click Save As.
- Open the desired folder to save the document in.
- Enter a File name for the Billing Upload Excel File.
- Select Excel Macro-Enabled Workbook from the drop-down list.
- Click Save.
- If desired, click Print.
Note: Clicking print automatically redirects to the Print View tab. Print View will only display the lines of the invoice that are currently selected on the Data tab.
- If desired, click File and select Print from the drop-down menu.
Send the Billing Upload File to SSC
- After you validate, save and print the Billing Upload Excel File, send the file as an attachment in an e-mail to genrecinvoices@umich.edu.
- The UM Dept. Contact email (step 8) listed in the template is contacted upon successful customer creation by SSC. The email will include the invoice number created. The invoice is available in imaging under that invoice number immediately.
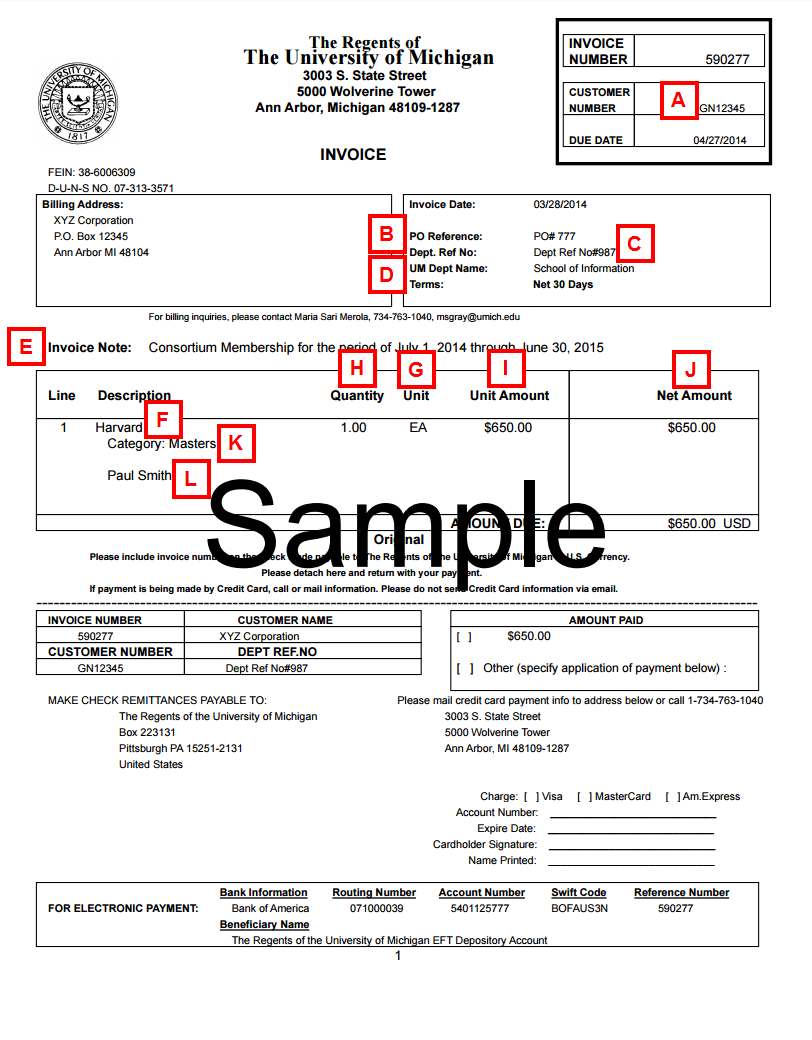
The images below illustrate where fields on the invoice appear on the actual invoice to the customer and provides a sample of the overall layout of the invoice that the customer will receive.
Billing Upload Template, Columns A-M Screenshot
Billing Upload Template, Columns N-O Screenshot