Overview
Report filters are used to suppress certain values some of the time and display them at other times, or display them in one report tab but not in another. The effect of a report filter is similar to that of a query filter. However, a query filter limits the actual data returned by your query. A report filter hides the data, but does not eliminate it.
A report must be in Design mode (upper-right hand corner) in order to apply filters.
This procedure covers the following:
Note: This topic is also covered in the Add/Delete Report Filters & Filter Options webinar.
Add a Filter
Filters can be applied to both a table and a report, however regardless of how it is added, the filter applies to the report as a whole. If a report has multiple tabs, the filter only applies to the tab on which it was added.
Apply a Filter Using a Table
- Click or double-click a data cell in the column where you want to apply the filter, so the cell and column are highlighted.
- If this is the first time you are clicking a cell in the table, you need to click twice to select the cell. The first click selects the table, as shown by a thicker blue outline around the full table. If you right-click on a cell at this stage, it applies to the table as a whole, not the specific cell/column. The second click on a cell selects the cell and highlights the column.
- Right-click on the selected cell.
- Click Data then select Add Filter.
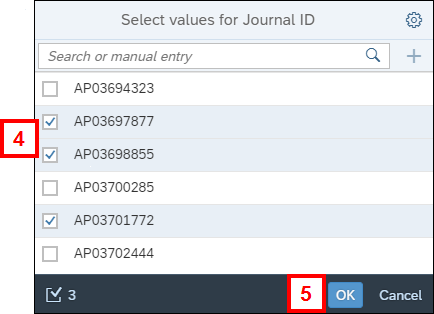
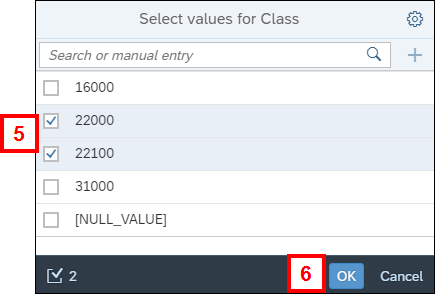
- Check the box(es) next to the value(s) you want included in the filter.
- If the list of values is long, you can search for values using the Search bar.
- The number at the bottom-left of the window shows how many values have been selected.
- Click OK.
- Repeat steps 1-5 as needed to add any additional filters.
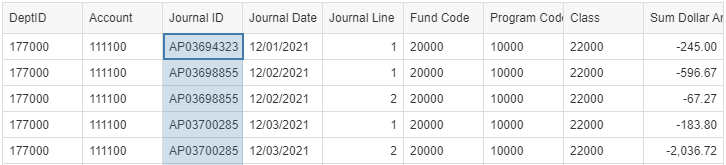
This image shows how a cell should display after being selected. The first cell in the Journal ID column is outlined and the full column is highlighted. Step 2 should be performed on the highlighted cell.
Apply a Filter to a Report
- Click Properties Panel
 to open the panel.
- The Properties Panel should display the Report Element Data when opened. If it does not, click Report Element Data
 .
.
- The Properties Panel should display the Report Element Data when opened. If it does not, click Report Element Data
- Click Main Panel
 to open the panel.
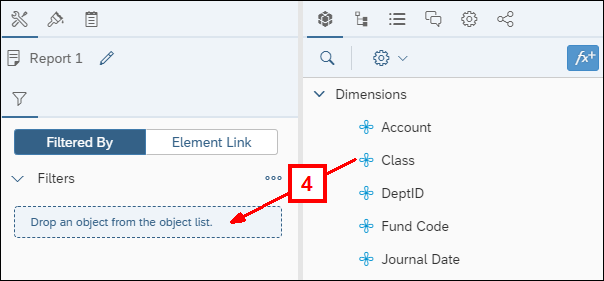
 - Click Document Objects
 .
. - Drag and drop the report element you want to filter from the Document Objects panel to the drop area on the Properties Panel.
- Check the box(es) next to the value(s) you want included in the filter.
- If the list of values is long, you can search for values using the Search bar.
- The number at the bottom-left of the window shows how many values have been selected.
- Click OK.
- Repeat steps 4-6 as needed to add any additional filters.
View Document Objects and Properties Panels
Delete a Filter
Filters need to be deleted at the same level at which they were applied.
Delete a Filter Applied to a Table
- Right-click on a cell in the column which has the filter applied.
- Select Data > Remove Filter.
- If Remove Filter does not display, make sure the cell is properly selected. See Step 1 in the Apply a Filter Using a Table section of this document for additional information.
Delete a Filter Applied to a Report
- Click Properties Panel to open the panel, if it is not already open.
- The Properties Panel should display the Report Element Data when opened. If it does not, click Report Element Data .
- The Properties Panel should display the Report Element Data when opened. If it does not, click Report Element Data
- Click Delete
 on the filter being deleted.
- Delete does not display on the filter tile until you hover over or click the tile.
- Delete
View Currently Applied Filters
When trying to determine what filters are applied to a report, you need to check at both the report and table level.
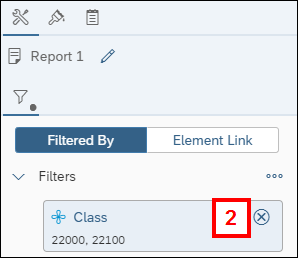
Filters display on the Report Element Data section of the Properties Panel . When nothing is selected on the report, the panel displays filters applied at the report level. Then, click on a table to view the filters applied at the table level.
Manage Filters
Once a filter is set up, you can adjust it as needed, including Adding Operators, Nesting Filters, and Changing Values. These actions are available by clicking the three-dot More menu on a report element listed on the Report Element Data panel.

Changing Values
An existing filter can be editing by selecting Change Values from the filter three-dot More menu. This opens the Select Values window. Check and uncheck the box(es) next to the values as needed. Click OK to apply the changes.
Adding Operators
By default, Filters include all the values you selected on the Select Values window. If you need a more complex selection, such as a date range, you can apply an Operator.
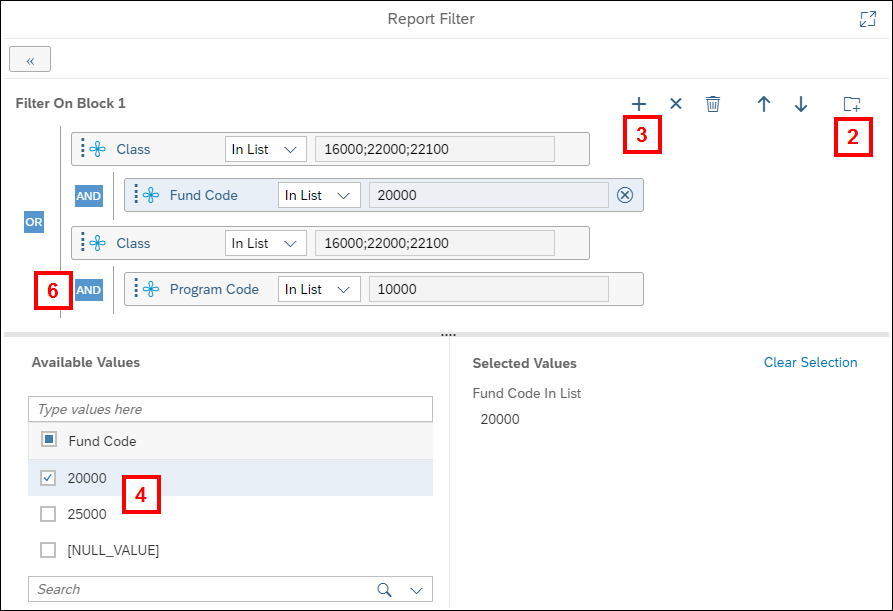
- Select Manage filter from the filter three-dot More menu.
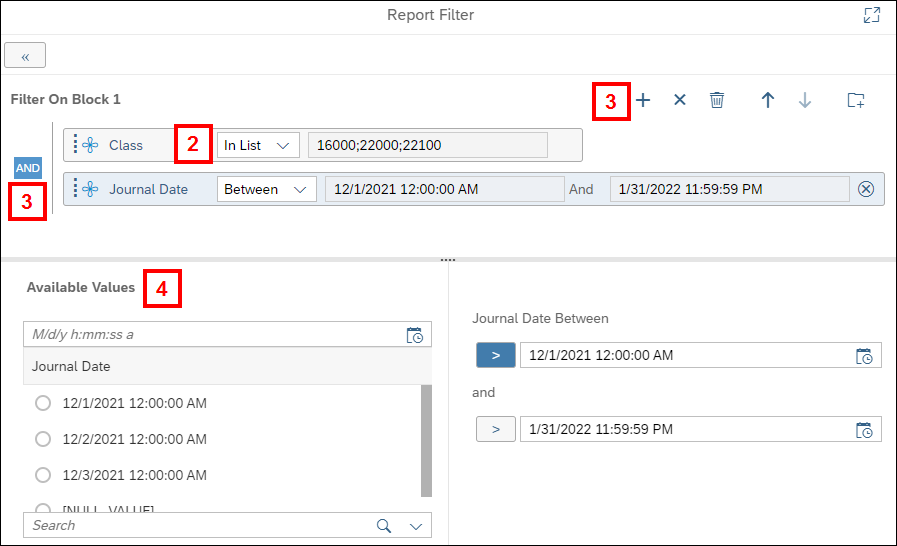
- Click the operation drop-down list and select a value.
- If needed, click Add Filter
 to apply another filter.
- Double-click AND to the left of the filters to toggle between AND and OR. AND means both filter statements must be true for the data to display on the report. OR means either can be true.
- Set or change values in the Available Values section.
- Click OK.
Nesting Filters
Nesting filters allows for complex filter combinations to be applied to your report. These filters use nesting along with AND/OR statements.
- Select Manage Filter from the filter three-dot More menu.
- Click Add Nested Filter
 .
. - Click Add Filter and select the Object being nested.
- Check the box(es) next to the value(s) being included in the filter in the Available Values section.
- Repeat steps 3-4 until all objects are selected and configured for the filter.
- Double-click AND/OR to the left of the nested and regular filters as needed to toggle between AND and OR. AND means both filter statements must be true for the data to display on the report. OR means either can be true.
- Click OK.