Overview
Breaks allow you to group your report by a particular object (such as Accounting Period). You can add subtotals and grand totals. You can fold breaks to hide details.
A report must be in Design mode in order to use breaks.
This procedure covers the following:
Note: This topic is also covered in the Create Report Breaks webinar.
Step-by-Step Process
Insert Breaks
- Right-click any data cell in the column where you want to insert a break.
- Be sure the cell is selected before right-clicking. The first time you click on the cell, the table is selected, as shown by a dark outline. The second time you click, the cell is selected and the column highlighted.
- Click Data and select Add Break.
Breaks can also be added using the Properties Panel.
- Click the table or a cell to select it.
- Click the Properties Panel icon

- Click the Report Element Data icon
 .
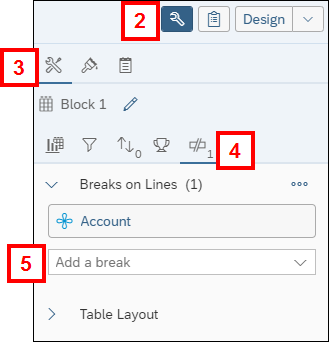
. - Click the Break Panel icon

- Select the field by which you want to break the report from the Add a break drop-down list.
Notes:
- When a break is added, a footer displays for each break value.
- To remove a break:
- Right-click on a cell in the column, click Data and select Remove Break.
- Click on the break field in the Properties Panel and click Delete
 .
.
Manage Breaks
Breaks have various properties that control how they look, such as add/removing headers or adding page breaks. You can apply and remove the properties as needed to see how different settings impact the report.
- Right-click anywhere in the table, click Data and select Edit Break. This opens the Break panel on the Properties panel.
- Alternatively, you can open the Break panel directly by clicking the Properties Panel icon , the Report Element Data icon and then the Break Panel icon .
- Alternatively, you can open the Break panel directly by clicking the Properties Panel icon
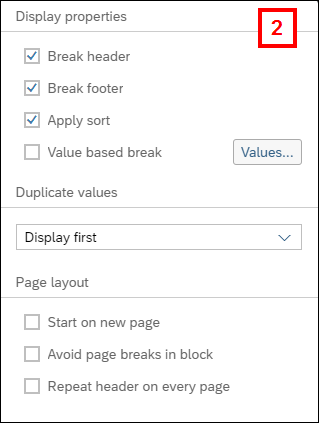
- Check and uncheck the boxes next to the elements you want to include or remove:
- Display properties: Includes options to display a header and footer, sort, and break on only specific values.
- Duplicate values: If there are duplicate values, set an option to display all, display the first value, merge them, or repeat the first value on a new page.
- Page Layout: Includes options to start each break on a new page, avoid page breaks in a block, and repeat the header on every page.
- Click OK.
Insert Additional Calculations
Subtotals display for each break, where applicable. You can add other calculations as needed.
- Right-click on a cell in the column where you want to apply a calculation.
- Click Footer Calculation.
- Select a calculation type.
- Depending on the data type, the options are Count, Min, Max, Sum, Average, and Percent.
Note: To delete a calculation, repeat the above steps, and select the calculation type to remove it. The currently selected calculation has a checkmark next to it. When it is selected a second time, the checkmark is removed.
Fold Breaks
Folding allows you to hide or display data in a report.
- Click the three-dot More menu in the Display section of the toolbar and click Fold/Unfold.
- Click the triangles next to a specific break value to collapse or expand it.
- Click the plus icon in the corner of the table to fold/unfold rows or fold/unfold break values.

