Important Information
- The Regular, Temporary, and Graduate Student Appointment job offer templates differ slightly. This step-by-step procedure illustrates a Non-Student Temporary job offer. See Prepare a Regular Job Offer and Prepare a Graduate Student Appointment Job Offer for more details.
- Prepare a job offer after you complete all interviews and select a Candidate.
- Prior to preparing the job offer:
- Ensure the job code/job title used to fill the position and offered to the Candidate is identified as “Primary” on the Job Openings Details page. If the job opening is filled as an underfill, you may need to change the job code/job title.
- Ann Arbor Campus: When preparing the job offer, add a contact note indicating the employee’s actual first date of employment for the I-9 Form, Section 2. The Regional I-9 offices use this date to complete the I-9 process.
- Review the dispositions for all applicants and update all seriously considered candidates. For more information on how to disposition applicants, see Disposition Applicants.
- Change the disposition of the selected Candidate to “Interview”.
- Changes can be made to a job offer until the offer status changes to “Accept”. For more information see Approve/Deny a Job Opening.
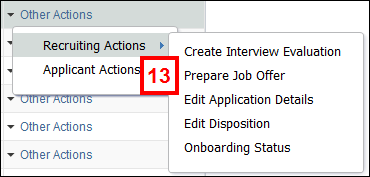
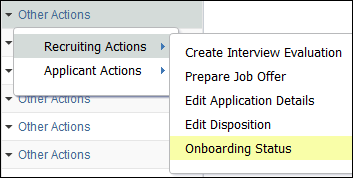
- To view existing offer information, select Prepare Job Offer from the Other Actions > Recruiting Actions drop-down menu.
- If selected Candidate rejects the job offer, copy all applicable comments from the offer and prepare a new offer for the next Candidate. Change the status on the original offer to “Withdrawn”, and then prepare a new job offer.
- For a Temporary job offer checklist and cheat sheet, see Offer Checklist & Cheat Sheet (Temporary).
Navigation
Homepage: Recruiting; Tile: Search Job Openings
NavBar > Navigator > Recruiting > Search Job Openings
Step-by-Step Process
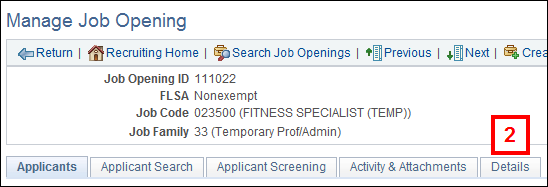
- Search for the Job Opening ID.
- Click Details.
- Click the left arrow
 or right arrow
  to find the underfill job code.
 - Check the Primary Job Code box, or verify it is checked.
- Scroll down.
- Click the Postings link from the Job Postings group box.
- Enter a new value in the Posting Title field.
- Scroll down.
- Click OK to return to the Details page.
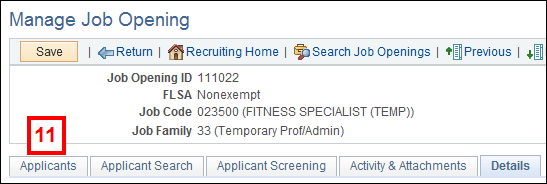
- Click Save.
- Click Applicants.
- Mark the candidate as interviewed, if not already assigned a Disposition of “Interview”. For more information on changing dispositions, see Disposition Applicants.
- Select Prepare Job Offer from the Other Actions > Recruiting Actions drop-down menu for the selected applicant.
- Verify that the correct department displays, or enter or lookup
 a value in the Appt Department field.
 - If applicable, enter or select the NEO Date (New Employee Orientation).
- Enter or select the Appt Begin Date.
- Verify or select the Offer Date.
- If the department uses Supervisor ID , enter or lookup the eight-digit EmplID.
- Verify the correct contact displays in the Posting Contact field.
- Enter the Comp Rate.
- Enter or select the Effective Date.
- Enter or select the Funding End Date.
- Enter or lookup the Shortcode.
- Enter the % Dist (Percent Distribution).
- To add additional shortcodes, click Add Row
 to insert a new row in the Earnings Distribution Detail group box and repeat Steps 23-25.
 - To add additional effective dates, click Add Row to insert a new row in the Effective Date Detail group box and repeat Steps 21-26.
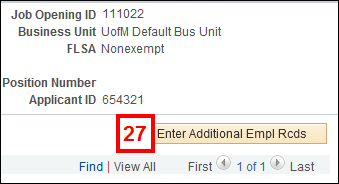
- To add an additional Empl Rcd, scroll up and click Enter Additional Empl Rcds. If no additional Empl Rcd is needed, go to Step 36.
- Enter, select, or verify the Appt Begin Date.
- Enter the Comp Rate.
- Enter or lookup the Job Code.
- If applicable, enter or lookup the Supervisor ID.
- Enter or select the Effective Date.
- Enter or select the Funding End Date.
- Enter or lookup the Shortcode.
- Enter the % Dist (Percent Distribution).
- To add an additional Empl Rcd, click Add Job Details to insert a new row in the Earnings Distribution Detail and repeat Steps 28-36.
- Click OK.
- If applicable, enter Comments.
- Order: Include the most recent comment at the top.
- Spacing: Use two line breaks between comments when possible.
- Format: <<MM/DD/YY First initial Last Name: Comment>>.
- General communication: Include any brief, pertinent comments related to candidate selection.
- Salary Expectation: Include brief comments regarding salary exceptions, if applicable.
Note: If the Job Opening ID is unknown, enter known values in search criteria field(s). For more information on how to search for a job opening, see Search Job Openings.
Note: Complete Steps 2-11 if the job opening is being filled as an underfill.
View Manage Job Opening screenshot
View Additional Job Specifications screenshot


View Posting Information screenshot

View Manage Job Opening screenshot
Note: To communicate the correct I-9 date to the Regional I-9 offices, add a contact note indicating the actual first date of employment. For more information on contact notes, see Add Applicant Notes.

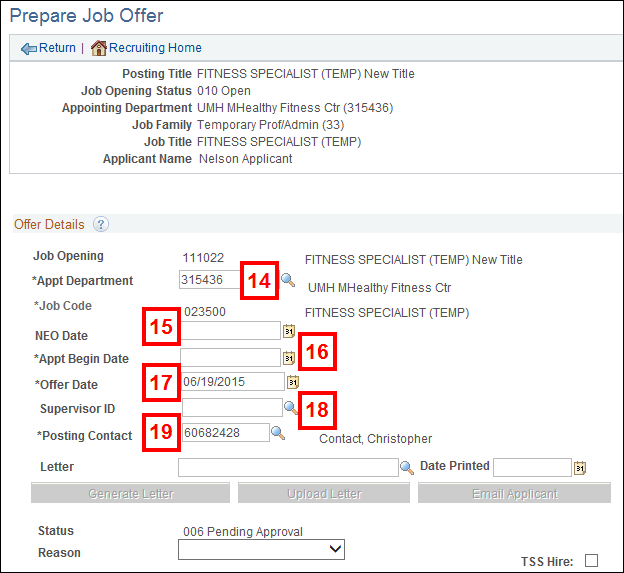
Note: The Offer Date field populates automatically with today’s date.
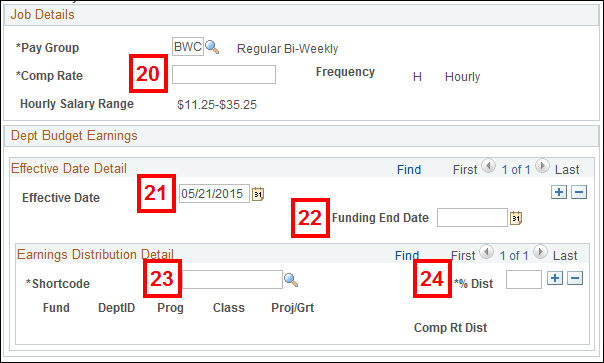
Note: The % Dist values for all shortcode rows must equal 100.
View Prepare Job Offer screenshot
View Additional Employee Records screenshot
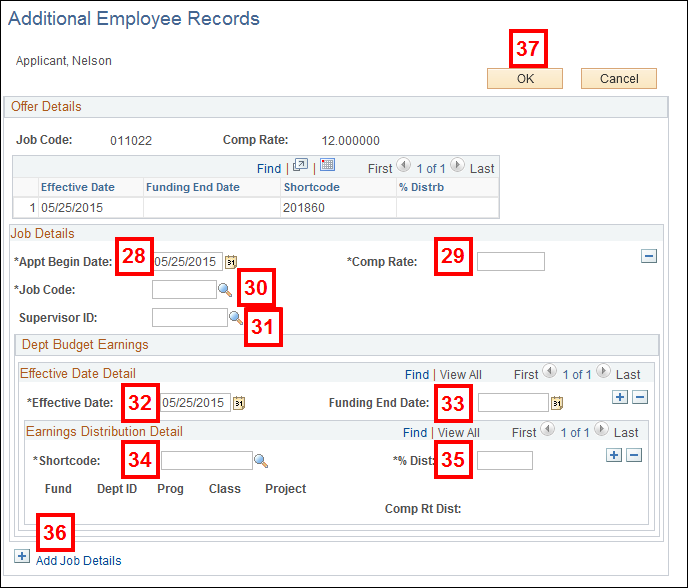
Note: The % Dist values for all shortcode rows must equal 100.

Note: Follow these recommendations when entering details in the Comments field:
Offer Approvers
- Hiring Team/Approvers for a job opening automatically populate as Approvers on the job offer. Verify the Approvers are correct and make necessary changes before finalizing the job offer.
- You may list any number of Approvers for the job offer. A few guidelines apply:
- For Michigan Medicine, at a minimum, an EPC is required and marked as Primary with a Seq# of 1. If multiple Offer Approvers are selected, the EPC must be the final Approver in the sequence and be the only one marked Primary.
- Group Approvers are automatically added and act as the primary and final approver for the Ann Arbor academic campus, Flint and Dearborn.
- Approvers review/approve the job offer in the exact sequence order that you provide.
- Every Approver must approve the job offer before the hire can be prepared.
- Verify the job offer Approvers are correct in the Offer Approvers group box.
- Click Add Approvers to add additional job offer Approvers.
- Click Delete Row
 to delete job offer Approvers.
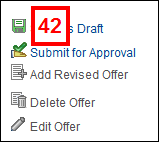
 - Click Submit for Approval.
View Offer Approvers screenshot

View Submit for Approval screenshot
For Reference
View the Onboarding Status from the Other Actions > Recruiting Actions drop-down menu for the selected applicant.
View Onboarding Status screenshot
To return to the Job Offer later, go to Pending Approvals and click the pending job offers Subject link or Search for the Job Opening ID and view the Details page.