Overview
This step-by-step procedure outlines how to Manage Interviews in M-Pathways Human Resource Management System (HRMS) - Recruiting.
Important Information
- The Interview Schedule information you enter into M-Pathways does not automatically populate Microsoft Outlook or Google calendars.
- Using the Interview Schedule page automatically dispositions the Applicant to “Interview”.
- Interview Schedule information can be sent via e-mail to the Applicant and appears on their applicant homepage.
- Interview Schedule information can be sent via e-mail to the Interview Team.
- For information on how to attach interview notes, see Add Notes and Attachments to a Job Opening.
- For assistance with interview questions and notes refer to the eRecruit Department Resources page.
Navigation
Homepage: Recruiting; Tile: Search Job Openings
NavBar > Navigator > Recruiting > Search Job Openings
Step-by-Step Process
- Search for the Job Opening ID.
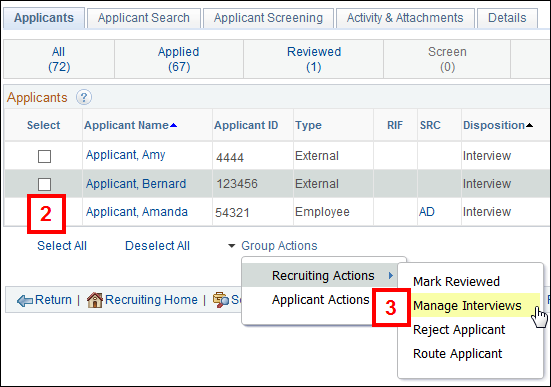
- Check the applicable Applicant Name box(es).
- Select Manage Interviews from the Group Actions > Recruiting Actions drop-down menu.
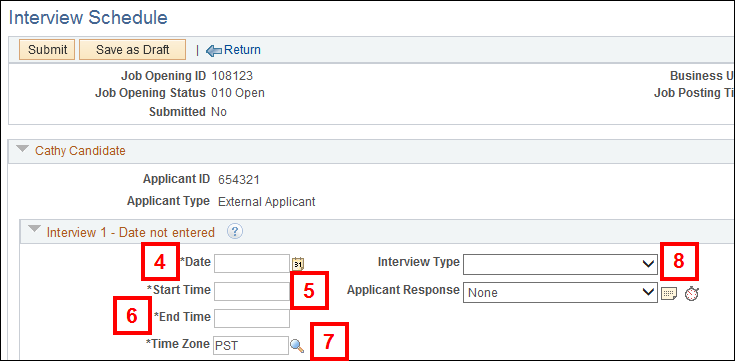
- Enter or select the interview Date.
- Enter the Start Time.
- Enter the End Time.
- Verify or lookup
 the Time Zone.
 - Select a value from the Interview Type drop-down list.
- If applicable, check the Notify Applicant box to send an e-mail reminder to the Applicant which also posts a notification on their Careers homepage.
- If applicable, check the Notify Interview Team box to send an e-mail reminder to the Interview Team.
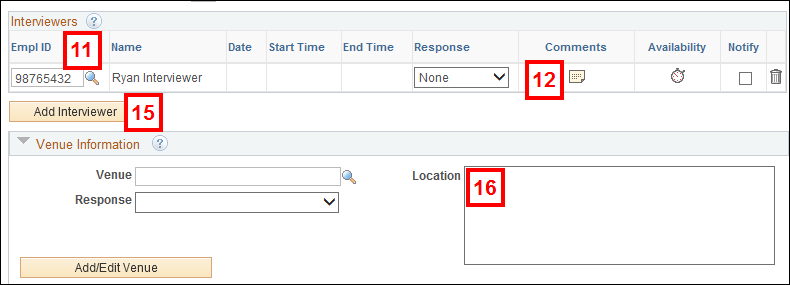
- Enter or lookup the Interviewers Empl ID.
- Any U-M employee can be an Interviewer.
- It is important to complete all Interview group box fields. This information populates the notification sent to Applicants and Interviewers.
- If applicable, click Comments
 or go to Step 15.
 - Enter Comments. Comments entered do not appear in the notification to the Applicant.
- Order: Include the most recent comment at the top.
- Spacing: Use two line breaks between comments when possible.
- Format: <<MM/DD/YY First initial Last Name: Comment>>.
- General communication: Include any brief, pertinent comments related to the scheduled interview.
- Click OK.
- Click Add Interviewer to add additional Interviewers and repeat Steps 4-15.
- (Optional) Enter the Location in the Venue Information group box.
- Click Save as Draft or Submit.
Note: If the Job Opening ID is unknown, enter known values in search criteria field(s). For more information on how to search for a job opening, see Search Job Openings.
View Select Applicant screenshot
View Interview Schedule screenshot
Note: When you submit the interview schedule, the e-mail is automatically sent to the Applicant and the notification is posted on their Careers homepage.
Note: When you submit the interview schedule, the e-mail is automatically sent to the Interview Team.
Notes:
Note: Follow these recommendations when entering details in the Comments field:
Note: For group interviews, enter the same interview schedule information as the previous interview.