Overview
There are two options in M-Pathways if you wish to duplicate an eProcurement requisition (ePro req) you have created in the past. Either option may save you data entry time when creating a new ePro req.
| ePro Template | Copy an ePro Req |
|---|---|
| A Template is a saved list of items. Consider using an ePro Template if you frequently order the same goods or services from a specific supplier, but you vary the ShortCode/ChartField combination for each order. | Copying an ePro Req allows you to open an identical copy of an ePro req you have created in the past. Consider copying a req when you need to place a repetitive order with a specific supplier using the same ChartFields. |
| Templates can be shared among ePro users. | You cannot copy another user’s ePro reqs. |
| Templates require that you reapply ChartField data. | Copied reqs apply the ChartFields and supplier from the original reqs. |
|
Both Templates and Copied reqs allow you to:
|
|
This procedure provides instructions for:
- Save an ePro Req as a Template
- Create an ePro Req Using a Template
- Manage your ePro Req Templates
- Modify Lines Entered from a Template in an ePro Req
- Save a New Version of a Template
You cannot create a template for M-marketsite ePro reqs.
Refer to Copy a Special Request eProcurement Requisition to copy an ePro req.
Refer to eProcurement My Profile Page to delete, share, or copy an ePro template.
Navigation
Homepage name: Purchasing and Payments; Tile: Create Requisition
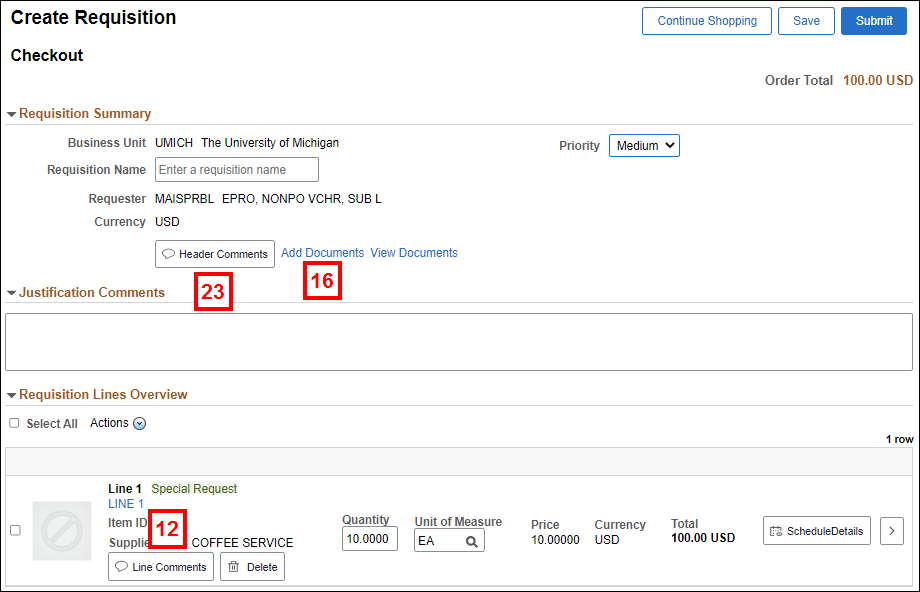
Save an ePro Req as a Template
Enter the ePro req following the instructions in Create a Special Request eProcurement Requisition. Before clicking Submit on the Checkout page, save the req lines as a template:
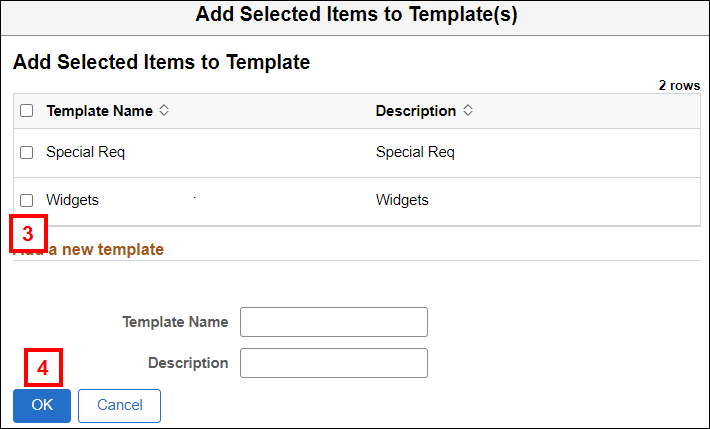
- Check the applicable Line box(es).
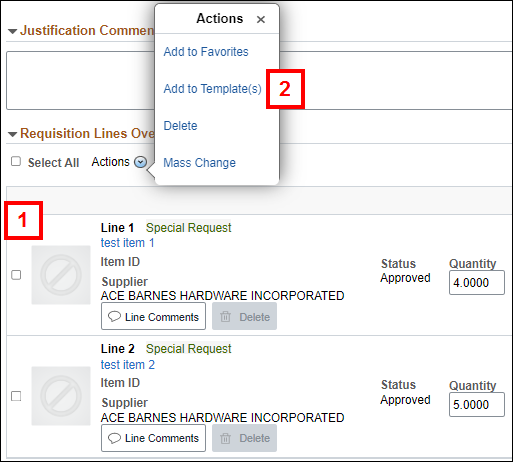
- From the Actions menu, click Add to Template(s).
- Enter a Template Name.
Add Selected Items to Template(s) Page Screenshot
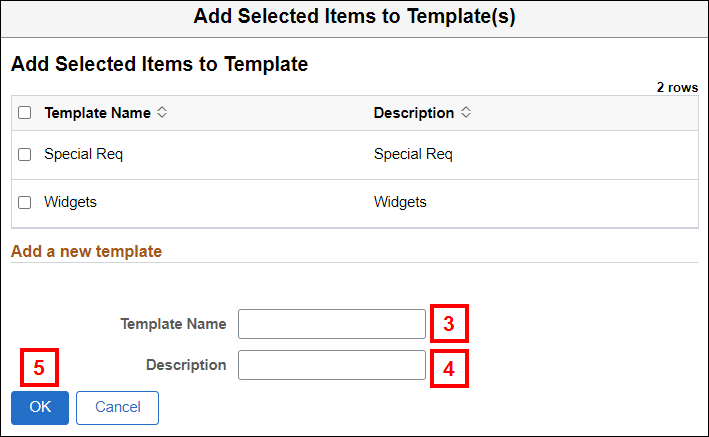
- Enter a Description.
Note: The Description must match the Template Name. - Click OK.
Create an ePro Req Using a Template
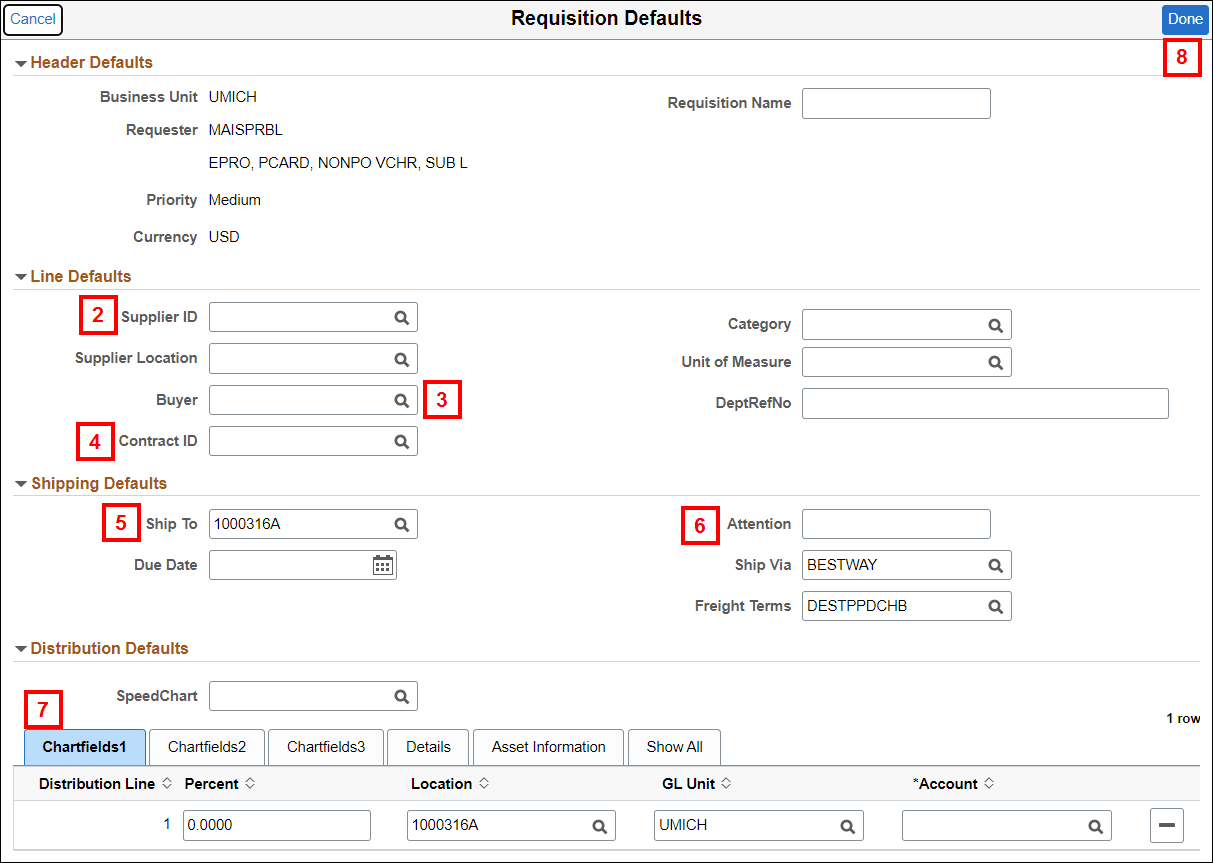
- Click Requisition Defaults.
- Enter or Lookup the Supplier ID.
- If you’re working with Procurement Services or Hospital Procurement to place an order, enter or Lookup the Buyer.
- If the supplier has a procurement contract with the university, enter or Lookup the Contract ID.
Notes:- Do not give the supplier the Contract ID number when discussing an order with a supplier. It will neither help you place the order nor will it help the supplier to fulfill it.
- If you need a new supplier contract, contact Procurement Services.
- You may also email a buyer in Procurement Services Directly.
- If multiple contracts exist for a supplier, a buyer from Procurement Services can assist you with selecting the appropriate Contract ID.
- Verify, Enter, or Lookup the Ship To code.
Notes:- The Ship To is a code that represents a building name and a street address. When entered in a Special Request ePro req, this code translates to the delivery address that is printed on the Purchase Order (PO).
- When you are granted access to enter ePro requisitions in M-Pathways, you are assigned a Ship To value that defaults into the Ship To field in the My Profile page and on the ePro req Requisition Defaults page. This default value corresponds to the building in which you work. Unless otherwise requested, the Ship To value you are assigned begins with a
1.
- Ship To codes beginning with
1
indicate the building only. The building name, street address, state, and zip code display on the PO that is sent to the supplier. - Ship To codes beginning with
2
indicate both the building and a specific room number. The building name, room number, street address, state, and zip code display on the PO.
- Enter the complete name and phone number, including area code, of the contact person for this req in the Attention field.
- Verify, Enter, or Lookup the SpeedChart or ChartField combination for the req.
Notes: - The SpeedChart is the same as a ShortCode.
- Do not enter an Account value. It defaults from the Category entered on each req line.
- Click Done.
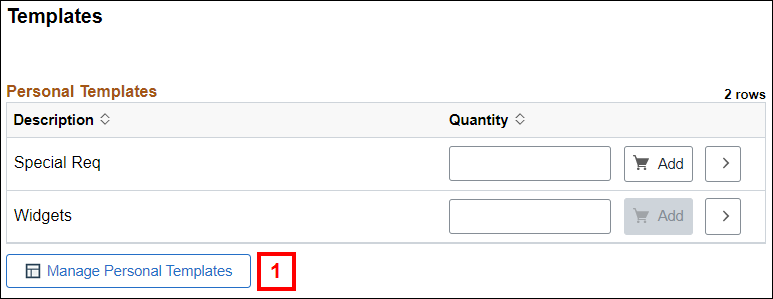
- Click Templates.
Create Requisition Page Screenshot
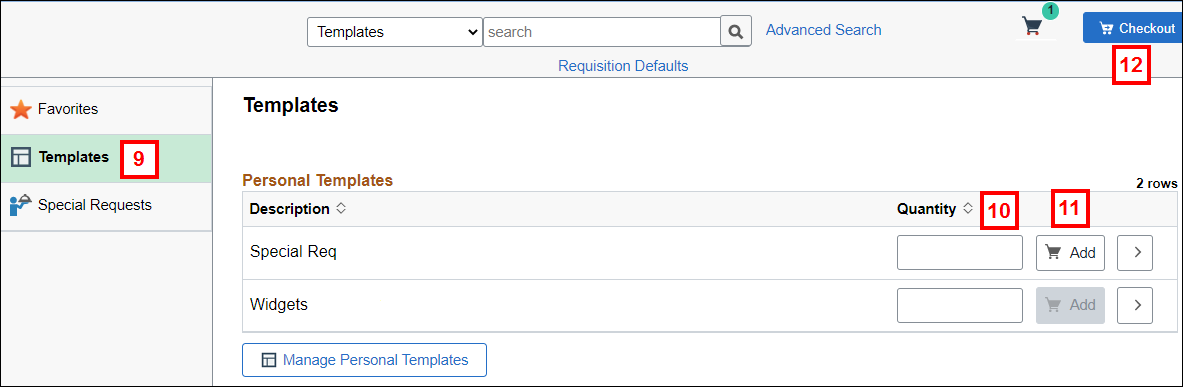
- Enter a Quantity to multiply the line quantity by that amount. E.g., if the template line has a quantity of 4 and you enter 2 in the Quantity field, the line on your ePro req will have a quantity of 8 (2 x 4).
- Click Add.
- Click Checkout.
- Complete the req. Refer to Create a Special Request eProcurement Requisition for more information.
Create Requisition Page Screenshot

Requisition Defaults Page Screenshot
Manage your ePro Req Templates
- Click Manage Personal Templates.
The Manage Personal Templates page allows you to:
- View or Edit Your Templates
- Share Your Template With Other Users
- Copy a Template That Has Been Shared
- Delete a Template
Refer to eProcurement Requisition Template for information on creating templates.
View or Edit Your Templates
- If applicable, rename or redefine the template by changing the following:
- Template Name
- Description
Note: The Description must match the Template Name.
Personal Templates Page Screenshot
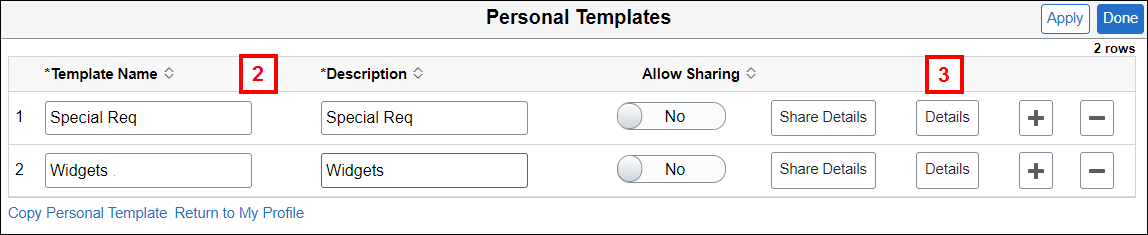
- Click Details for the template you wish to view or edit.
- Review template details.
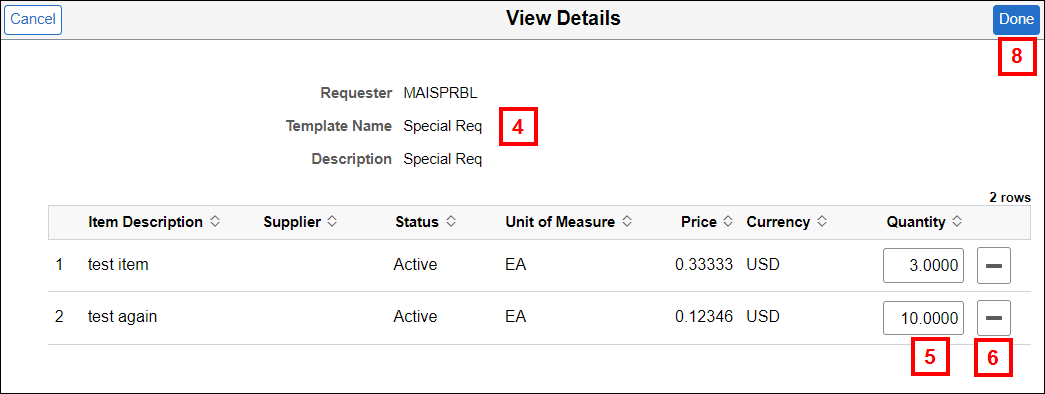
- If desired, update the Quantity field.
- If desired, click Delete Row
 to delete an item from a template.
 - Click OK.
- Click Done.
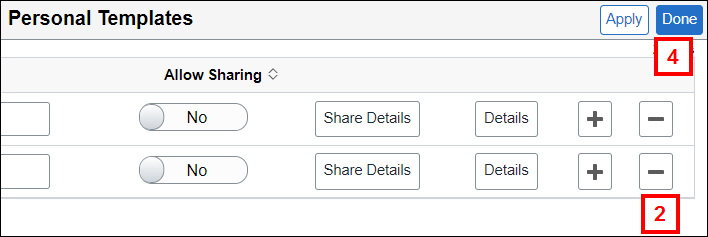
Share Your Template With Other Users
- Click the Allow Sharing button.
Personal Templates Page Screenshot
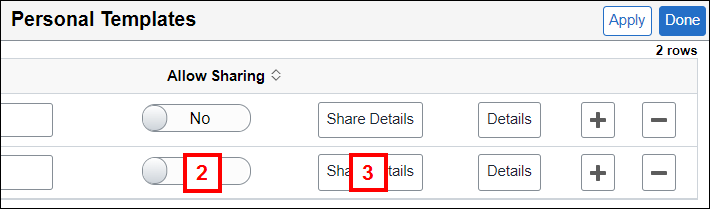
- Click Share Details.
- Enter or Lookup the uniqname of the user you wish to share the template with in the User ID field.
Note: The uniqname must be in capital letters.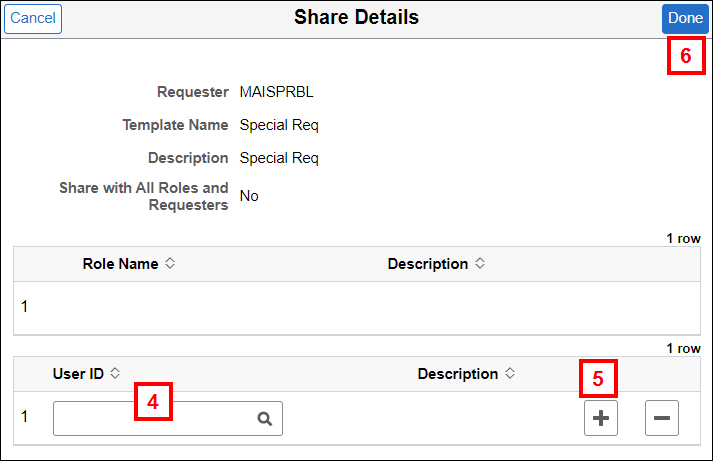
- If applicable, click Add Row
 to add additional template users and repeat step 4.
 - Click Done.
Copy a Template That Has Been Shared
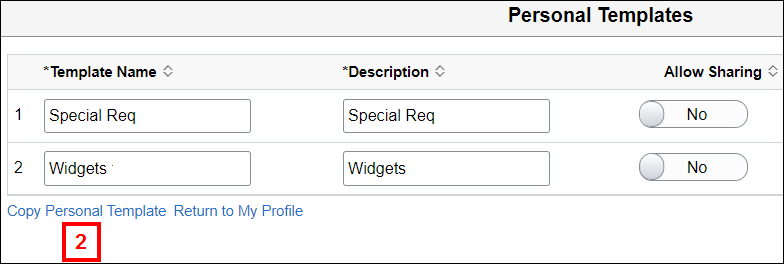
- Click Copy a Personal Template.
Note: To copy another user’s template(s), the owner must first share it.Personal Templates Page Screenshot
- Enter or Lookup the uniqname of the user whose template you wish to copy in the Requester field.
Note: The uniqname must be in capital letters.Copy Personal Template(s) Page Screenshot
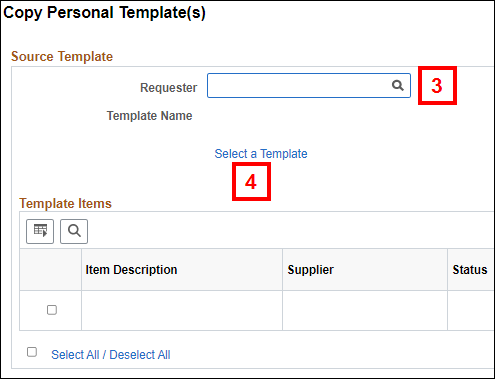
- Click Select a Template.
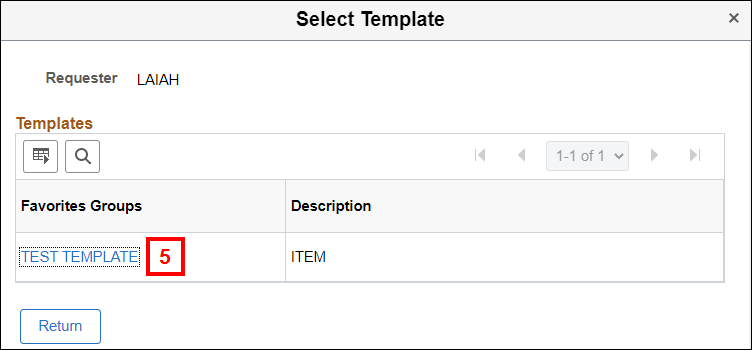
- Click the link for the template you wish to copy.
Select Template Page Screenshot
- Enter a Template Name.
Copy Personal Template(s) Page Screenshot

- Click Copy to Target Template.
- Enter a Description for this template.
- Click Save.
Delete a Template
- Click Delete Row for the template you wish to delete.
Personal Templates Page Screenshot
- Click OK.
Note: Clicking OK permanently deletes the template. - Click Done.
Modify Lines Entered from a Template in an ePro Req
In some cases you may need to modify the ePro req after adding lines from a template. Modifications include:
Add a Line to the ePro Req
In general, additional lines are added to the req before you go to the Checkout page.
- Click Special Requests.
Create Requisition Page Screenshot
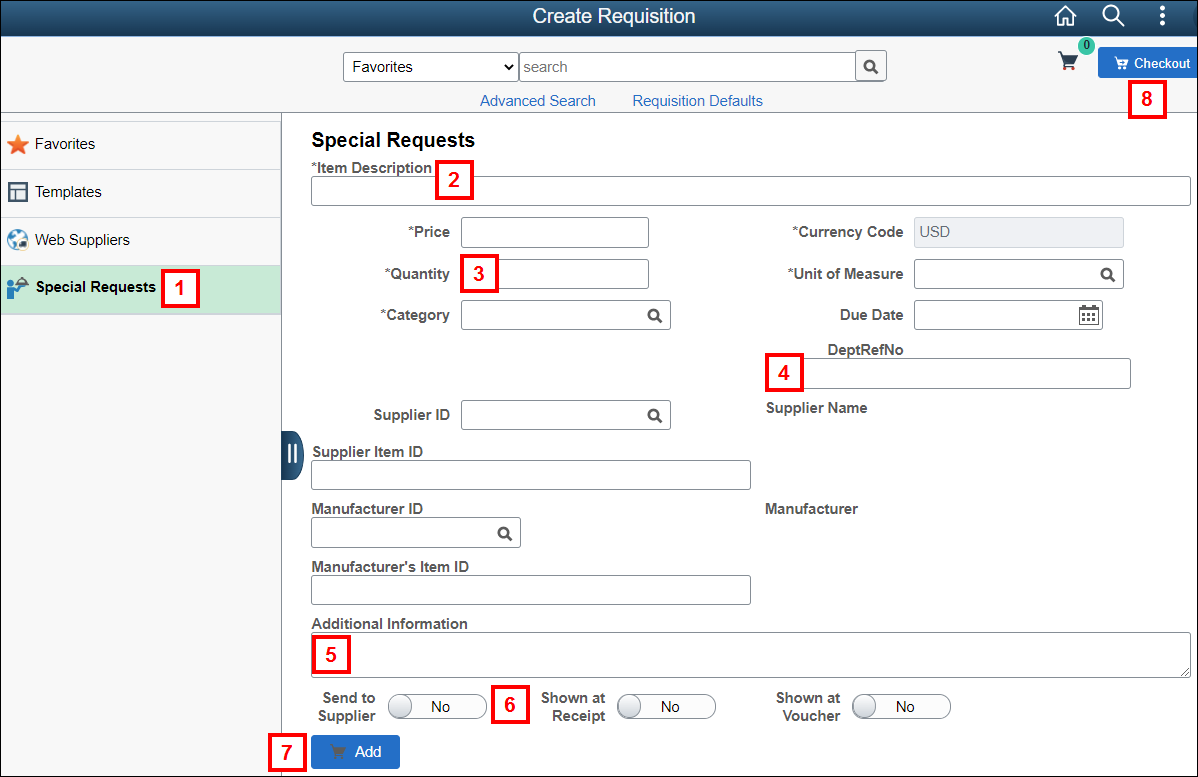
- Enter an Item Description
- Enter or select applicable values for the following fields for the req line:
- Price (i.e., unit price)
- Quantity
- Unit of Measure (UOM)
- Category
- If applicable, enter a departmental reference number in the DeptRefNo field for the line.
- If applicable, enter a comment for the line in the Additional Information field.
- Select where the comment applies:
- Send to Supplier displays on the PO that goes to the supplier.
- Show at Receipt (PLACEHOLDER)
- Show at Voucher provides payment information to Accounts Payable.
- Click Add.
Note: For additional items, repeat steps 1-7. - Click Checkout.
- Complete the req. Refer to Create a Special Request eProcurement Requisition for more information.
Delete a Line
- Check the applicable Line box(es).
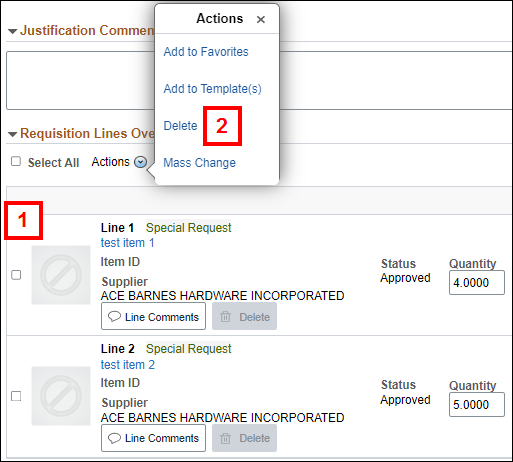
- From the Actions menu, click Delete.
Change Shipping and Accounting Information for a Line
- Click Schedule Details next to the req line.
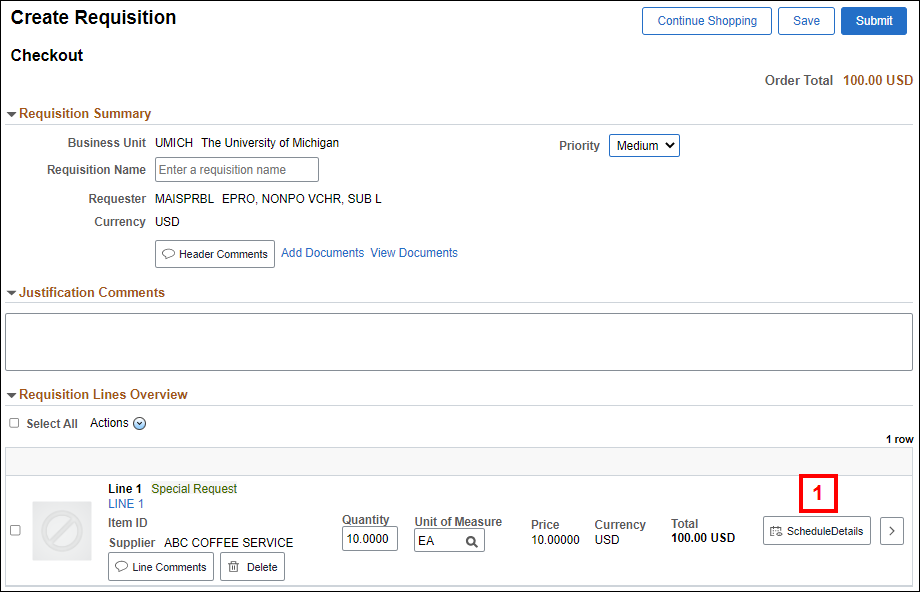
- Verify, Enter, or Lookup the Ship To code for the individual req line.
Requisition Line Details Page Screenshot

To split the distribution for a req line among multiple ChartField combinations by the quantity of the item ordered or by dollar amount, complete steps 3-10. Otherwise go to step 11.
- Verify the ChartFields1 tab is selected or click it.
- Select Quantity or Amount from the Distribute By drop-down list.
- Change the value in the Quantity or Merchandise Amount field to the value you want to distribute to the first ChartField combination.
Note: Changing the Quantity or Merchandise Amount prior to adding the row allows the M-Pathways system to automatically calculate the values for the subsequent distribution(s). - Click Add Row to insert an additional ChartField distribution row for the req line.
- Click the ChartFields2 tab.
Requisition Line Details Page Screenshot
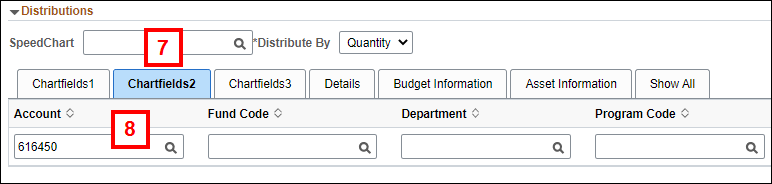
- Enter or Lookup the ChartField values for the new distribution row.
Note: Repeat for steps 3-8 for additional distribution rows. - If applicable, click the ChartFields3 tab to enter Project/Grant information. Otherwise, go to step 11.
Requisition Line Details Page Screenshot
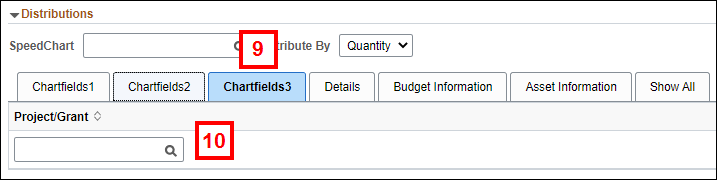
- Enter or Lookup the Project/Grant for applicable lines.
- Click Done.
Complete steps 12-15 to add comments for an individual req line. Otherwise, go to step 16.
- Click Line Comments.
- Enter Comment Text.
- Select where the comment applies:
- Send to Supplier displays on the PO that goes to the supplier.
- Show at Receipt displays at time of receiving and on saved receipt.
- Show at Voucher provides payment information to Accounts Payable.
- Click Done.
Complete steps 16-26 to add comments and attachments to the entire req. Otherwise, go to step 27.
- Click Add Documents.
- Click Add Attachment.
- Click My Device.
- Navigate to and Open the file.
Note: Only .pdf and .tif files are accepted. - Click Upload.
- Click View to verify the file is attached.
Note: Repeat steps 17-21 for additional files. - Click Done.
- Click Header Comments.
- Enter Comment Text to notify Procurement Services that an attachment is included in the requisition.
Note: Comments are required if you include an attachment. - Select where the comment applies:
- Send to Supplier displays on the PO that goes to the supplier.
- Show at Receipt displays at time of receiving and on saved receipt.
- Show at Voucher provides payment information to Accounts Payable.
- Click Done.
- Complete the req. Refer to Create a Special Request eProcurement Requisition for more information.
Save a New Version of a Template
In some cases you may wish to add the new/modified items to your existing template. To save the ePro req as a new, separate template, follow the steps in the Save an ePro Req as a Template section of this document.
- Check the applicable Line box(es).
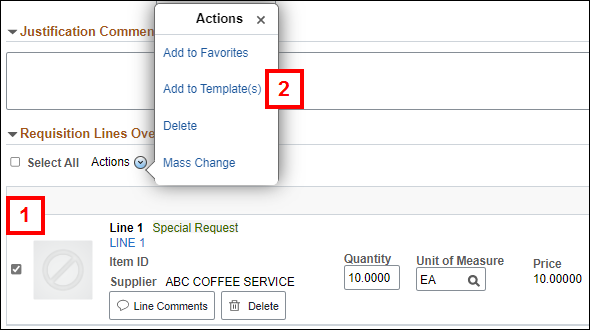
- From the Actions menu, click Add to Template(s).
- Check the box for the template you wish to add the new items to.
Add Selected Items to Template(s) Page Screenshot
- Click OK.