Overview
Subaward voucher payments require approval by both the SAPOC and the Project Director in order to be paid. These vouchers are routed to the SAPOC and the Project Director for the project/grant on a Purchase Order with an origin of OCA.
This procedure includes information on:
- Accessing a Voucher from the System Notification
- Approving or Denying a Voucher
- Specifying an Additional Approver
- The M-Pathways Worklist
- Viewing/Printing the Concurrence Receipt
Important Information
Alternate approvers must be designated to receive the email notifications and Worklist entries for a specified time period to be able to approve vouchers in the system. Temporary assignment must be established prior to the routing of the voucher for approval.
- A SAPOC or Project Director can designate an alternate on the M-Pathways Approval Profile page. M-Pathways will automatically assign the FN PROJ DIR SAPOC SUBAWRD USER role to the alternate.
- A user who also has the ePro Requester role can designate an alternate approver on the M-Pathways My Profile page. This person would receive the email notifications and Worklist entries for a specified period of time in order to approve vouchers in the system.
Navigation
Options for locating vouchers for departmental approval:
- Notification Email – the designated approver (SAPOC, Project Director, or alternate approver) receives a notification email that a voucher requires approval. The email includes a link to access the Voucher Approval page.
- M-Pathways Worklist – the designated approver can click the Worklist link in M-Pathways to access a list of transactions that require approval.
- Navigate in M-Pathways – NavBar > Navigator > Accounts Payable > Vouchers > Approve > Approval Framework - Vouchers
Step-by-Step Process
Accessing a Voucher from the System Notification
- Click the voucher link in the Notification Email to go to the voucher Approval page.
Note: If you are not logged in, the M-Pathways login screen displays. After logging in, the Approval page displays. If you are already logged in to M-Pathways, the link takes you directly to the Approval page.
Approving or Denying a Voucher
- Verify Voucher (number) and Total fields on the Approval page.
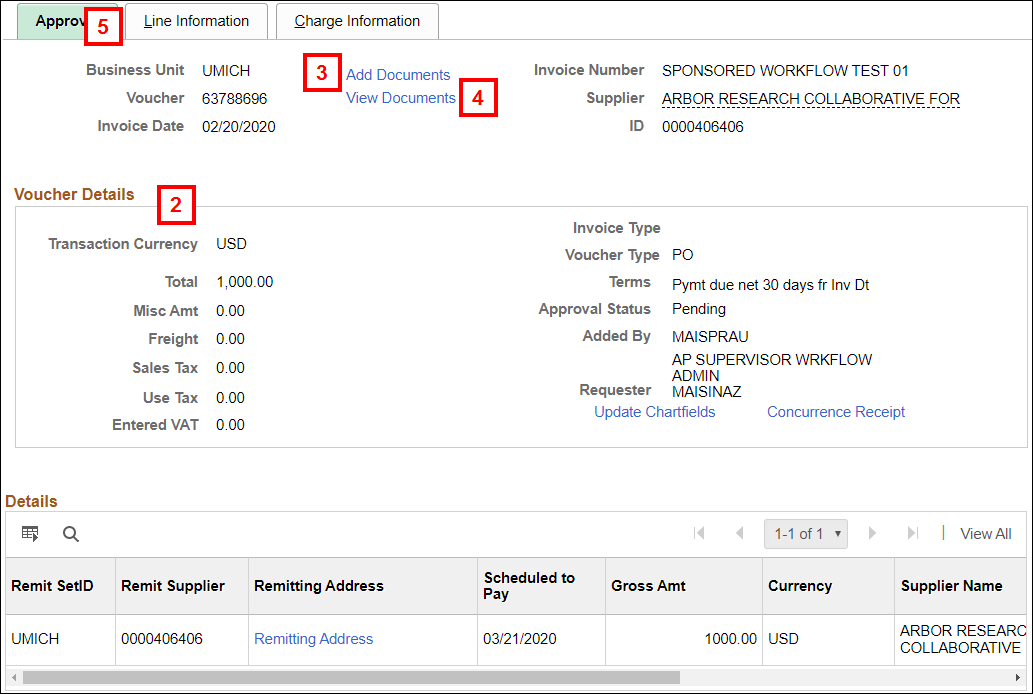
- To add additional supporting documentation, click Add Documents.
- To view supporting documentation, click View Documents.
Note: You must be on a MiWorkspace computer or connected to the VPN to view documents. - Click the Line Information tab to verify voucher line information.
- Verify the following Line Detail information:
- Description of item(s)
- Quantity ordered
- Merchandise Amt
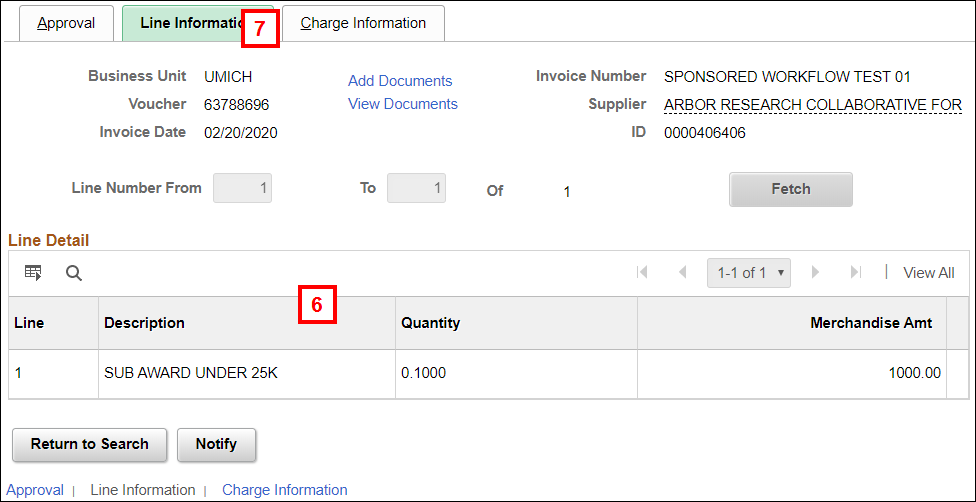
- Click the Charge Information tab to verify ChartField information.
- Verify ChartFields for each line as appropriate.
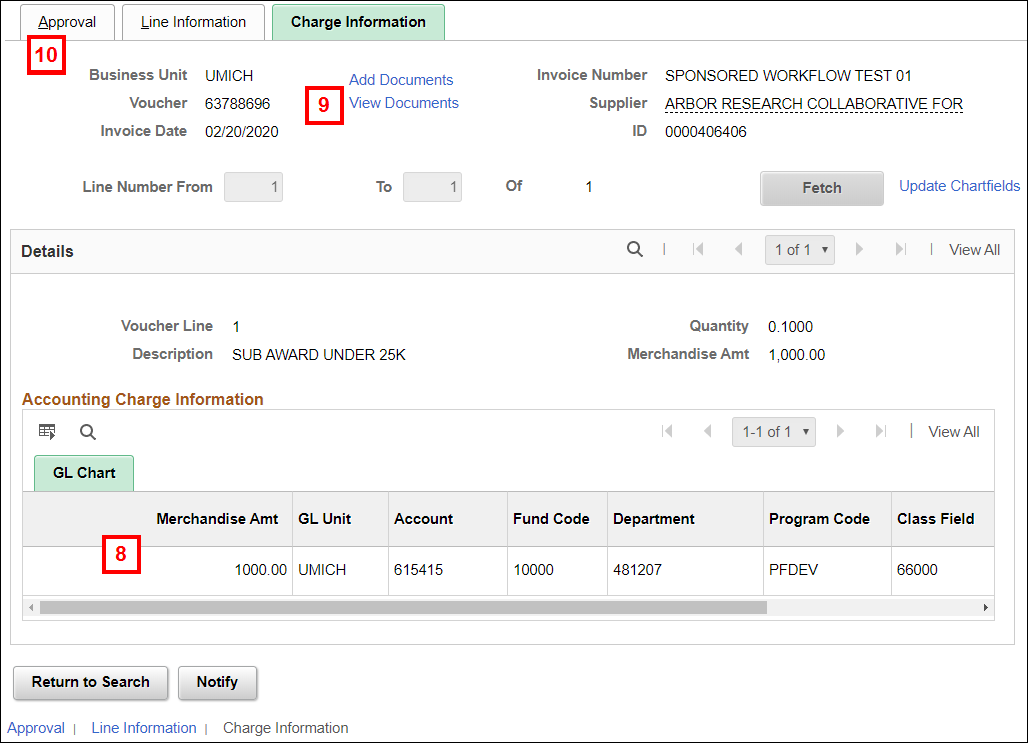
- Review the supporting documentation by clicking View Documents.
- Click the Approval tab.
SAPOC Approval
- Click Approve.
Note: The voucher will then route to the Project Director.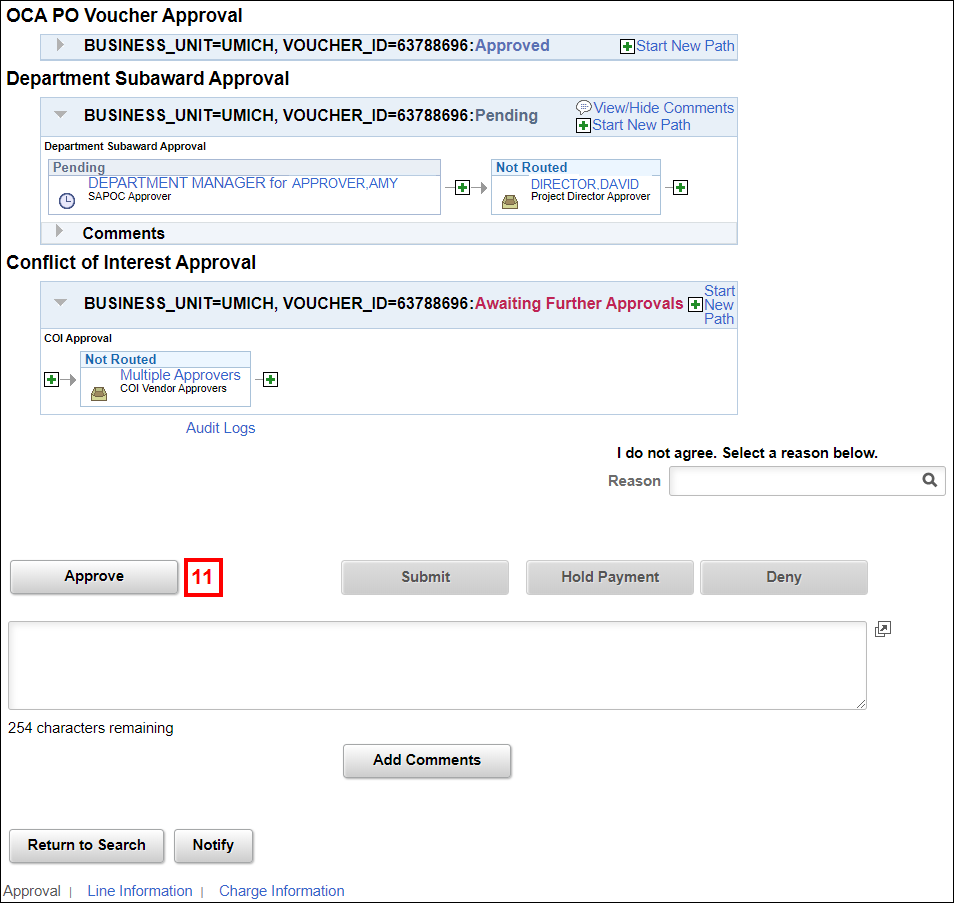
Project Director Approval
- Check the I agree box.
Note: The Approve button appears.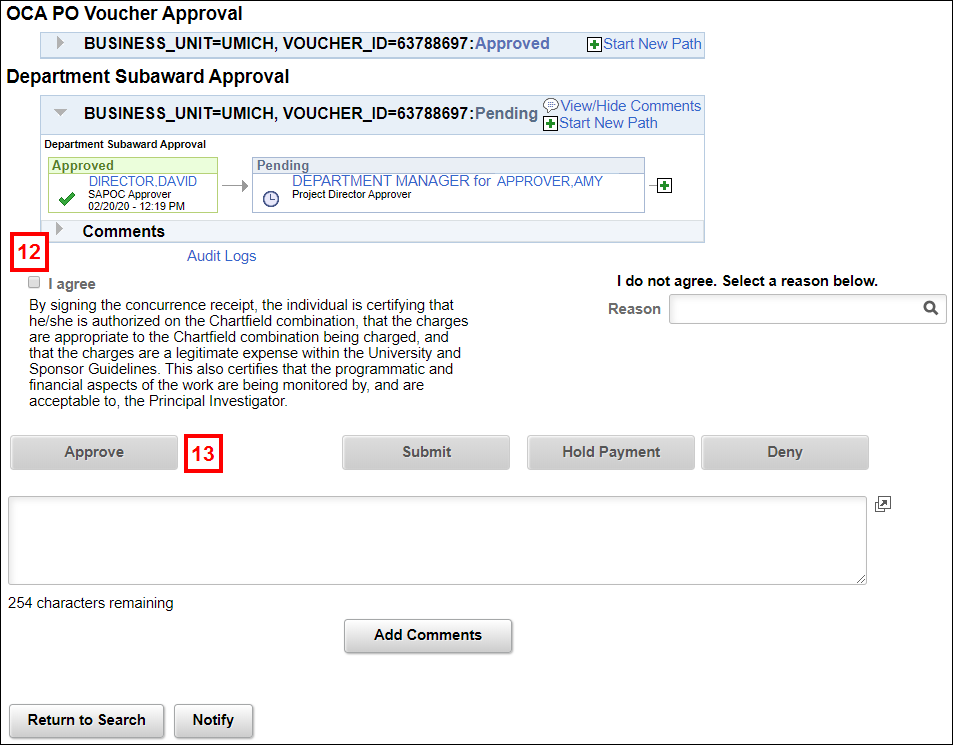
- Click Approve.
Note: The attestation verbiage populates in the Comments section and is retained after the I agree box is checked and Approve is clicked.
Deny a Transaction
- Select Dispute Subaward/hybrid paymnt from the Reason drop-down list.
Notes:
- Other options for denial appear, but Dispute Subaward/hybrid paymnt is the only reason SAPOC and Project Directors should use.
- The notification for the denial will go to the Office of Contract Administration (OCA).
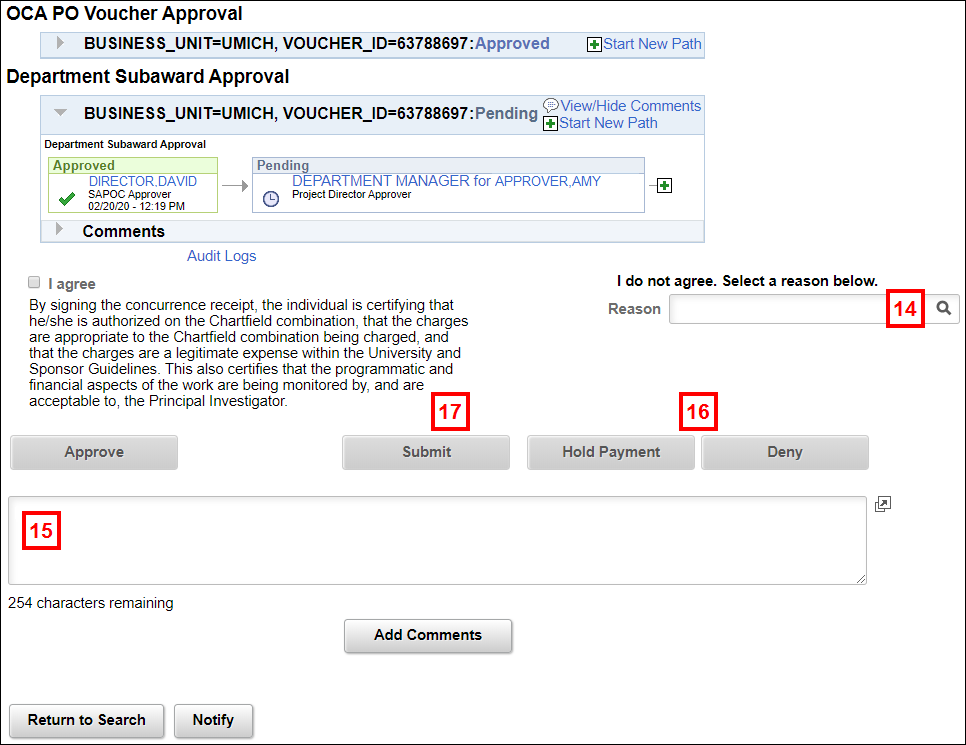
- Enter comments to outline the reason for not approving.
- Click Deny or Hold Payment.
Note: Buttons appear based upon the Reason chosen (only one will be available and active). Hold Payment will be active if the correct Reason for not approving is selected. - Click Submit.
Note: A note is sent to OCA with the denial reason and additional comments, if applicable.
Specifying an Additional Approver
Before you approve a voucher, you may specify another person as an additional approver.
Note: The additional approver must have one or more of the following roles:
- PR DEPARTMENT MANAGER USER
- PR EPRO USER
- PR BUYER USER
- PR WF AP APPROVER
The additional approver does not act as your substitute! You must approve the voucher to route it to an additional approver. The system will not route a denied voucher to an additional approver.
- Click Insert Approver
 .
. - Enter (ALL CAPS) or Lookup the uniqname of the desired approver in the User ID field.
Insert Additional Approver Screenshot

- Click the Approver radio button.
- Click Insert.
- Click Approve.
Note: The Approval box changes to indicate current voucher status.- The box with your name turns green and displays an Approved status.
- The box with the additional approver’s name changes to a Pending status.
The M-Pathways Worklist
In addition to the email, you can use your Worklist to locate and access the voucher’s Approval page.
It is recommended to use the approval email instead of the Worklist to access a voucher for approval. The Worklist displays all vouchers and requisitions that are routed to you for review (as FYI), as well as those for your approval, but, unlike the email, doesn’t indicate which action to take.

- To access your Worklist, log in to the M-Pathways Financials and Physical Resources system and go to NavBar > Worklist..
- Select Approval Routing from the Worklist Filters field. This narrows the list to those transactions requiring your review or approval.
- Select the link for the voucher to open the Approval page.
- Follow the Approving or Denying a Voucher steps, as applicable.
Viewing/Printing the Concurrence Receipt
- Click Concurrence Receipt on the Approval page.

- Enter or Add a Run Control ID.
- Enter the Voucher ID in the From and To fields.
Concurrence Receipt Screenshot
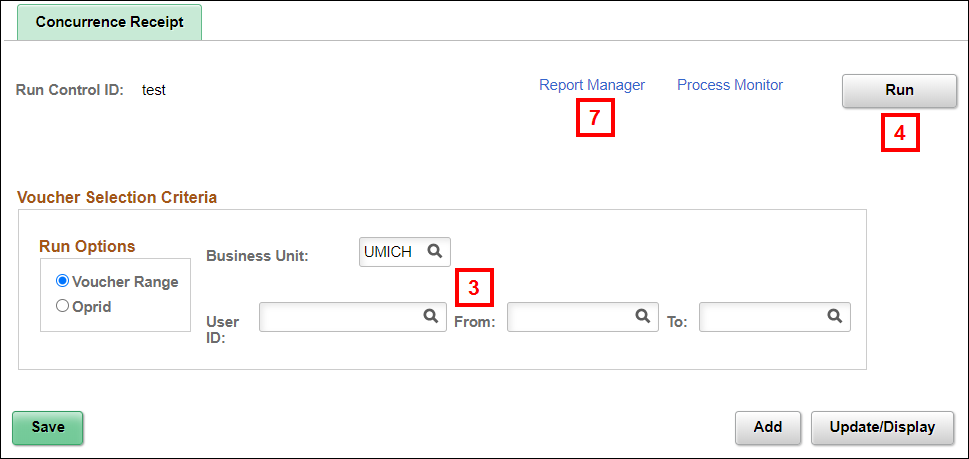
- Click Run.
- Select PSUNX from the Server Name drop-down list.
- Click OK.
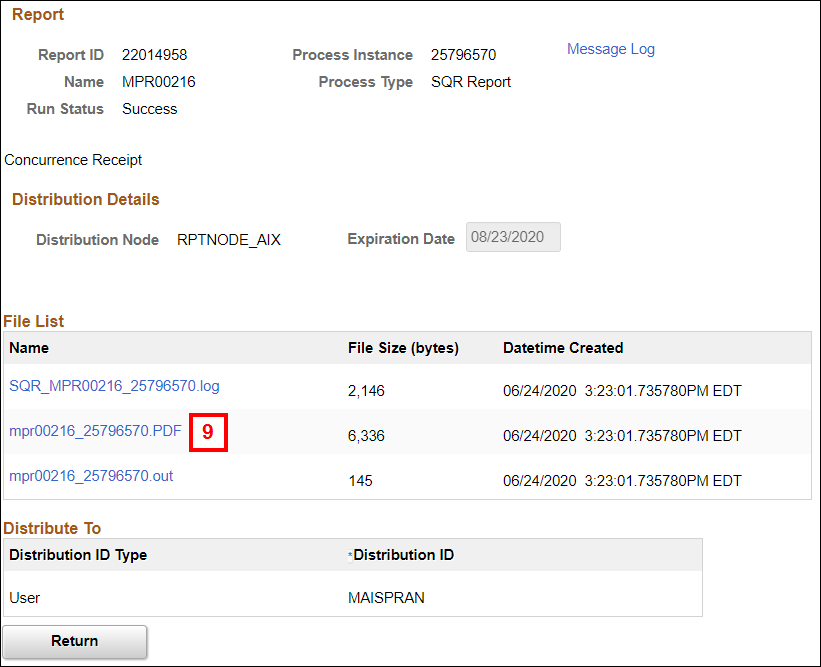
- Click Report Manager.
- Click the Report link.
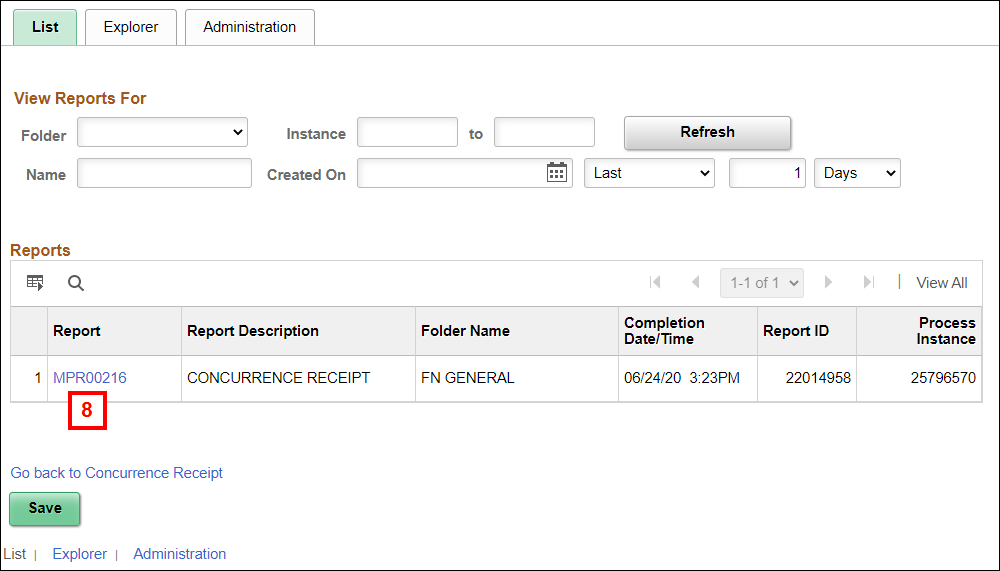
- Click the PDF link to open the Concurrence Receipt in a new tab.