Overview
Each employee needs to initially modify and then maintain their Expense Profile information to assist in creating expense reports in Concur.
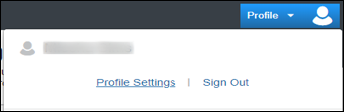
Navigate to your Expense Profile by clicking Profile Settings on the Profile drop-down menu.
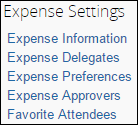
This procedure describes the required and most common optional data entered in the Expense Profile. Review the procedure in its entirety or click a link below to learn about a specific option.
- Expense Information – add an optional default ShortCode or Business Intelligence Manager
- Expense Delegates – add optional delegates
- Expense Preferences – manage expense emails and prompts
- Expense Approvers – add the appropriate expense report approver(s) defined by your unit
Concur displays the Expense Profile settings on multiple panes and offers multiple navigation options to each pane. This document uses the left navigation menu as an example.
Step-by-Step Process
To navigate to a specific pane, click one of the following links in the left navigation menu:
- Expense Information - to define a default ShortCode
- Expense Delegates - to define an employee who can create or approve expense reports on your behalf and to view Delegate For information
- Expense Preferences - to define which emails and prompts notify you about the status of your reports
- Expense Approvers - to define the employee who reviews and approves your expense reports and cash advance requests
Expense Information
The Expense Information pane is used to designate a default ShortCode, if applicable. This ShortCode is automatically applied (i.e., defaulted) to each expense report (and all lines within each report) that are created and/or submitted.
- If the same ShortCode is used for most expenses, entering a ShortCode may reduce data entry when creating an expense report.
- If a variety of ShortCodes are used for expenses, a default ShortCode may result in additional data entry when creating an expense report.
The Expense Information pane is also used to designate a BI (Business Intelligence) Manager, if applicable. This individual has access to delivered Concur Intelligence reporting data. Units can utilize the BI Manager functionality to provide key employees and administrators the ability to generate reports for the unit.
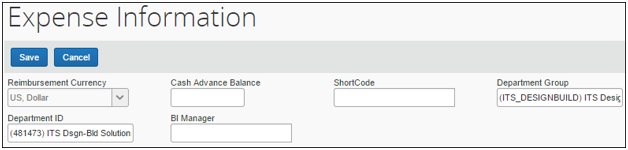
- Enter a ShortCode.
Notes:- As values are entered in Concur search fields, a list of valid values which match the search parameters appear in a drop-down list. Select the appropriate value from the list.
- If your ShortCode does not appear, confirm the Type to search by parameter is set to Code.
- Do not press Enter after entering the ShortCode (or a partial value) in the field. Concur stops searching if Enter is pressed, which may result in the system not displaying the appropriate value.
- Enter the last name of the BI Manager and select the appropriate name from the drop-down list. If applicable, modify the search parameters by clicking the Search Approvers By down arrow in the drop-down.
- Click Save.
Expense Delegates
The Expense Delegate pane is optional. Three types of delegates can be defined:
- Expense report delegate for expense report preparation.
- Expense report preview approval delegate for expense report review, but not approval.
- Backup approver for expense report approval during a leave.
Delegates do not have access to update the delegate information in your profile.
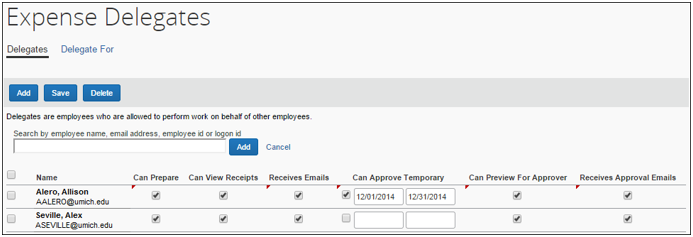
To Add a Delegate
- Click Add.
Note: The pane expands to display the Search field. - Enter and select the Last Name or Email Address for your desired delegate.
- Click Add.
Note: The employee’s name is added to the grid below and the pane collapses. - If the delegate will prepare expense reports, check the Can Prepare box.
Note: Concur automatically checks the Can View Receipts box when the Can Prepare box is selected. - If this delegate should receive email notifications on your behalf, check the Receives Emails box .
- Click Save.
To Set-up a Preview Approval Delegate
- If applicable, complete steps 1-3.
- If this delegate needs to review expense reports in your approval queue, check the Can Preview For Approver box .
- Check the Receives Approval Emails box so this delegate receives email notifications that reports have been submitted for approval.
Note: The Can View Receipts box is automatically checked so preview approval delegates can review receipts – do not uncheck this box. - Click Save.
To Set-up a Backup Approver
- If applicable, complete steps 1-3.
- Check the Can Approve Temporary box.
- Define the date range for which the back-up will temporarily approve expense reports.
Notes: - Concur automatically begins and stops sending expense reports to this individual on the defined dates.
- Either you or the back-up approver can approve expense reports in your Approval queue during the defined date range.
- Check the Receives Approval Emails box in order for the back-up to receive email notifications that reports require approval.
Note: The Can View Receipts box is automatically checked so backup approvers can review receipts – do not uncheck this box. - Click Save.
To Delete a Delegate
Each employee is responsible for maintaining their list of delegates. If a delegate role changes (e.g., employee leaves the unit), delete that employee as your Expense Delegate.
- Check the box next to the employee’s Name.
- Click Delete.
- Click OK. The system automatically saves the changes to the Expense Delegates pane.
Delegate For Pane
If an employee has been defined as a delegate, the Delegate For pane displays the individuals they can delegate for and permissions for each. Click the Delegate For tab within the Expense Delegates pane to view this information.

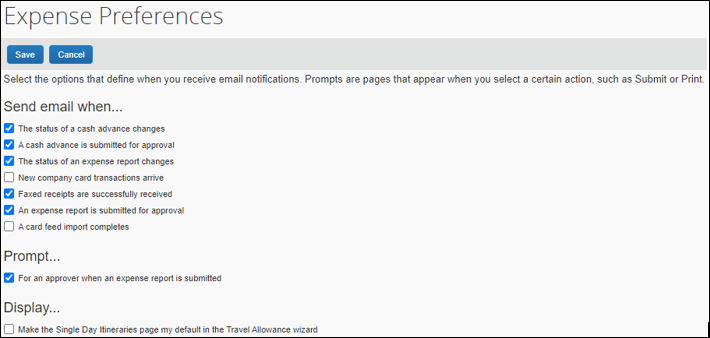
Expense Preferences
U-M defines the following preferences as shown below and recommends that they not be changed. If a pre-defined U-M setting is unchecked, critical reminders are removed about transaction changes in the Concur system that need attention or the status of expense reports and cash advances. Use the chart below to learn about the pre-defined settings. Settings not defined in the table are not used by U-M.
Preference |
Email/Prompt Received | Implication if Setting Changed |
|---|---|---|
The status of a cash advance changes. |
Email received when a cash advance request is approved or rejected. | Manually check the Active Cash Advances list (Expense > Cash Advances). |
A cash advance is submitted for approval. |
Email to the Cash Advance approver identified in an Expense Profile. | Manually check the Cash Advance Approval List (Expense > Cash Advances). |
The status of an expense report changes. |
Email received if an expense report is approved, processing for payment, or extracted for payment. | Manually check the Active Reports list (Expense > Manage Expenses). |
Faxed receipts are successfully received. Note: Faxing receipt images is no longer supported by Concur. |
Email indicating that Concur has received faxed receipts and linked them to the expense report. | Manually check that the receipt file has been received and loaded by Concur using the options under the Manage Receipts tab within the expense report. |
An expense report is submitted for approval. |
Email notification to the approver, when an expense report is placed in their approval queue. If this option is not checked in the approver’s Expense Preferences, the approver will not receive email notifications for expense reports requiring approval. | Manually check the Reports Pending your Approval list (Approvals). |
For an approver when an expense report is submitted. |
Prompt received to accept or change the default approver; or add additional unit approvals for the report. |
|
While not pre-defined by the U-M, check the New company card transactions arrive preference box to be alerted when card transactions are loaded into the Concur system. Once loaded, these transactions are available to be imported into an expense report.
Expense Approvers
The Expense Approvers pane is used to designate expense report approver(s) and/or a cash advance approver defined by the unit. The expense report approver is responsible for the unit approval of submitted expense reports.
- Concur prompts you to verify, change, and/or add additional unit approvers when an expense report is submitted.
Note: Concur sends a courtesy notification to the default approver if an expense report is routed to an alternate employee or another employee is added in the approval workflow prior to the default approver. - Concur electronically routes submitted reports to the default approver(s) for unit approval.
- Delegates can update the default approvers in the Expense Profile.
If cash advances are requested for travel or hosting expenses (as opposed to using a PCard/Travel Card or paying out-of-pocket), enter a default cash advance approver in the Expense Profile. This individual is responsible for the unit approval of cash advance requests. Concur prompts you for an approver when a Cash Advance request is submitted if this field is blank in the profile. If a default cash advance approver is already listed but needs to be changed, change the approver by going into the Report Timeline in the cash advance request.
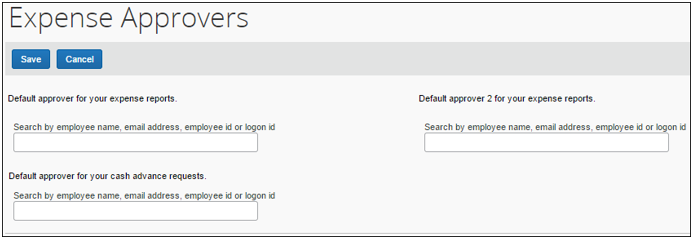
- Enter the uniqname or last name of the approver in the Search field, or if desired click the Search Approvers By down arrow to modify your search parameters.
- Select the appropriate approver from the Search drop-down list.
- If applicable, repeat steps 1-2 to assign a second default approver.
- If applicable, repeat steps 1-2 for the cash advance approver.
- Click Save.
Note: When two default approvers are assigned in the profile, all expense reports submitted will require two levels of approval. If appropriate, either of the default approvers can be changed on the fly in the expense report.