Overview
There are several steps to investigate, diagnose, and resolve a ticket that are not included in this document. Those steps include investigating the incident on your own through research, emails exchanged with coworkers and speaking directly with others about the incident. This type of investigation and diagnosis will happen with each incident, but is not recorded in this step-by-step. Following are the steps that include specific functions in an Incident record in ServiceNow. Reminder: If the incident is a Priority 1 and has not been resolved within an hour, this is a Significant Incident and the Significant Incident process must be followed.
Navigation
ServiceNow > Incident Application > Assigned to me
Step-by-Step Process
- Click the applicable Incident Record. If you receive a notification of Incident assignment, you can click on the link in the email to open the Incident Record.
Notes:- Hover over the Caller name to view a form with information on that caller.
- Hover over the Assignment Group to view a form with information on that Assignment Group.
- Hover over the Assigned to in order to view a form with information on the Assignee.
- Select the appopriate Assignment Group If the Incident is not already assigned to you.
- Select yourself from the Assigned to search icon. It is also possible to type the name of the Assignee in the Assign to field and then search on the Assigned Group. Another person can be assigned to the Incident using the Secondary Assignee field. Check with your Assignment Group Owner on how and when to use this field.
- Review the additional information at the bottom of the Incident Record to assist with investigation of this incident.
Click the Show Activity Stream icon to go directly to the bottom of the incident record.
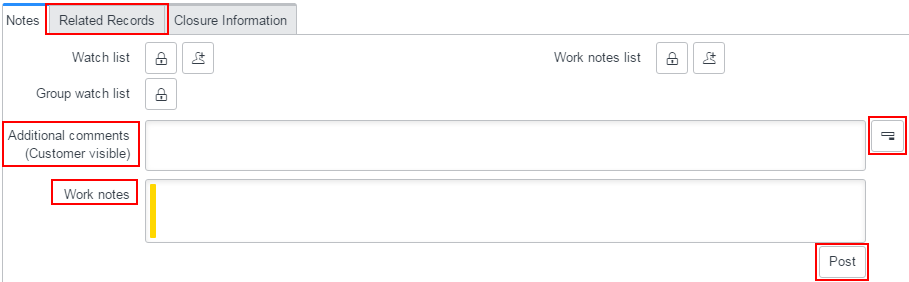
Notes:- Related Search Results: Search results from the Knowledge base populated based on the original Short Description. Click the Related Search Results button to close.
- Additional Comments: Use this field to add notes and communicate with the caller. Upon saving the record, notes entered will automatically be sent to the caller in an email notification. This email is already formatted with standard language. It is not necessary to enter any other information besides what you've added in Additional Comments.
- Work Notes: Check the Work Notes box to add Work Notes. Use this field to track any internal work being done on the incident. Click Post to save the Work note to the Incident record. Note that Work Notes are denoted by a yellow bar.
- Related Records: This tab allows you to relate the current incident to another incident as a parent incident.
- Tasks SLAs: Allows you to track on whether or not the incident is within the Service Level Agreements.
- Child Incidents: This tab allows you to link multiple child incidents to this incident. This will resolve all children incidents when this parent incident is resolved. The Resolution Code, Additional Comments, and Notes will be included in child incidents.
- Related CIs: This tab lists all CIs currently related to the Caller.
Lower half of Ticket Record Screenshot
- Change the Assigned to field if re-assigning the incident to someone in the same Support Group. If re-assigning the incident to someone in another group, only the Assignment Group box must be changed. Add information in the Work Notes section when re-assigning to indicate the reason for doing so.
- Resolve an incident by:
- Selecting Resolve from the State drop-down menu.
- Clicking the Resolve button at the top of the incident.
There are there are four required fields when resolving an Incident. These fields do not become visible until the Incident is put in to the Resolve State.
- Select the applicable Configuration Item. Configuration Item: component that needed to be managed in order to deliver the service or resolve the issue.
- Select the applicable Close Code. Close code: indicates what action was needed to resolve the issue.
- Select the applicable Resolution category. Resolution category: the breakdown categorization of how the issue was resolved.
- Include all applicable Close notes: notes describing the resolution using customer-focused language. An email notification will automatically be sent to the customer. This email is already formatted with standard language. It is not necessary to enter any other information besides notes describing the resolution.
- Click Save or Save & Exit when you have completed the required resolution information.