Overview
Important Information
- There are two tabs on the Enter Time page for employees in Punch Time departments – Punch and Elapsed. The differences are:
- Punch displays the employee's punch times and hours. It is used to:
- Approve punches (times and total hours) and time reporting codes (TRCs).
- Add or edit punch times or TRCs, submit the changes, and approve the edited punch times and associated hours.
- Approve Non-Punch Time (e.g., paid time off) that was submitted on the Elapsed timesheet.
- Change approved time, submit the changes, and then reapprove the updated time.
- Add and approve Non-Punch Time for one day at a time.
- Elapsed displays only the elapsed time entered (blank if none entered).
- This may be more efficient than the Punch tab when reporting the same TRC for a span of time (e.g., a week of vacation).
- After submitting the reported time, it is necessary to switch back to the Punch tab to approve the reported time.
- Punch displays the employee's punch times and hours. It is used to:
This document contains the following sections:
Navigations
There are two ways to approve time in M-Pathways:
Time and Labor WorkCenter:
Homepage: Payroll or HRMS, Tile: Time and Labor WorkCenter > Approvals by Employee section (default start page)
Homepage: Payroll or HRMS, Tile: Time and Labor WorkCenter > Approvals section
Enter Time page - timesheet view
Homepage: Payroll or HRMS, Tile: Time & Labor WorkCenter > Enter Time
or
Homepage: Payroll or HRMS, Tile: Time Entry Pages > Enter Time
Step-by-Step Process
Approve Reported Time - Time and Labor WorkCenter
Two sections are available in the Time and Labor WorkCenter to approve time:
- Approvals by Employee - allows you to approve time by employee. Upon selecting this option, all time that needs to be approved displays to the right.
- Approvals - displays a line for each time the employee clicked 'Submit' on a timesheet (oldest first).
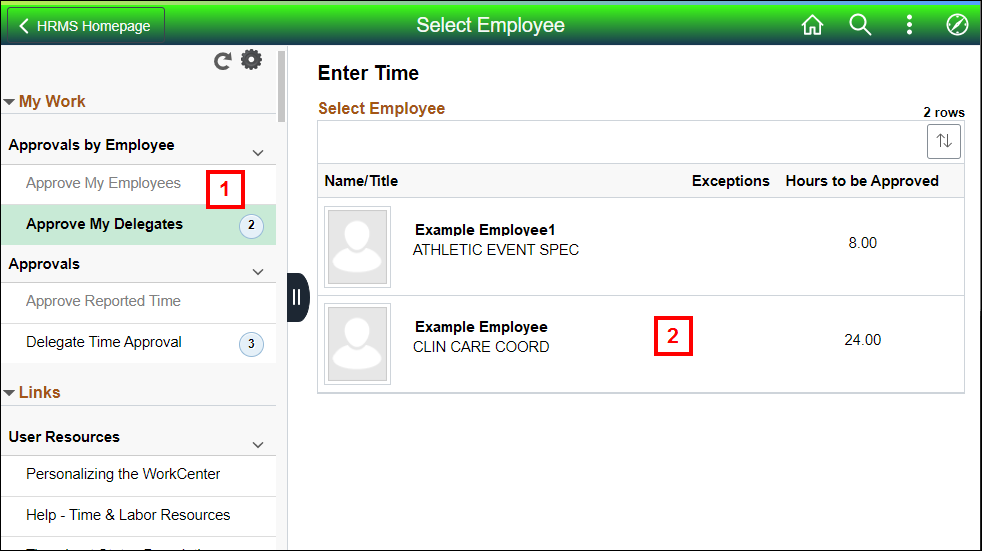
Approvals by Employee Section
- If you are a primary time approver, click Approve My Employees. OR
- Click on the line/employee to be approved.
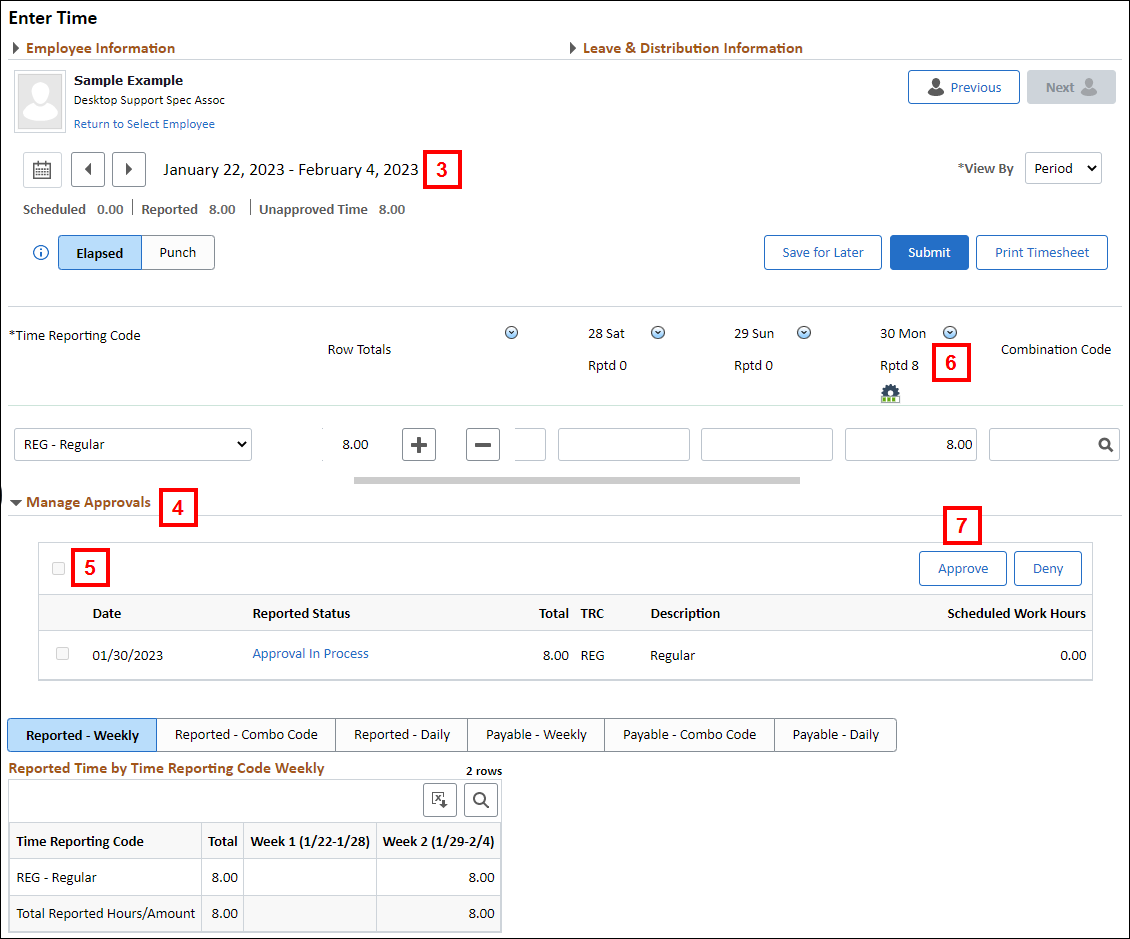
- Review the employee's Enter Time page.
- The Enter Time page opens the oldest time period that has time that needs to be approved.
- Review the employee's Manage Approvals section.
- Check the Select box for each approved row, or click Select All.
- If applicable, add Approver Comments.
- Click Approve.
- Click Yes to confirm the status change.
If you are a delegate time approver, click Approve My Delegates.
Approve Employee Reported Time Screenshot
Employee Reported Time Screenshot
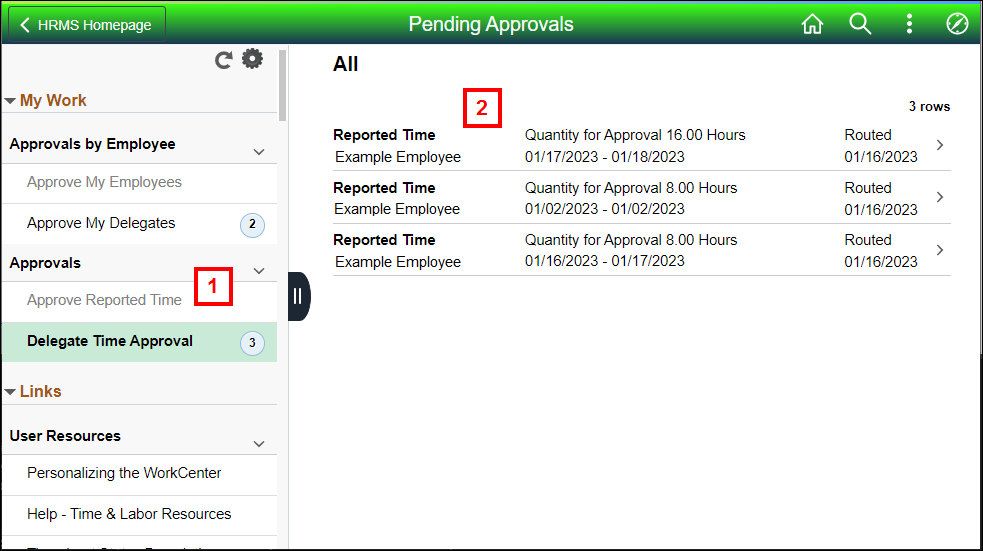
Approvals Section
- If you are a primary time approver, click Approve Reported Time. OR
- The Pending Approvals show based upon submit date/time not per employee (oldest first).
- Click on the line/employee to be approved.
- If an employee submitted their time multiple times, multiple rows appear.
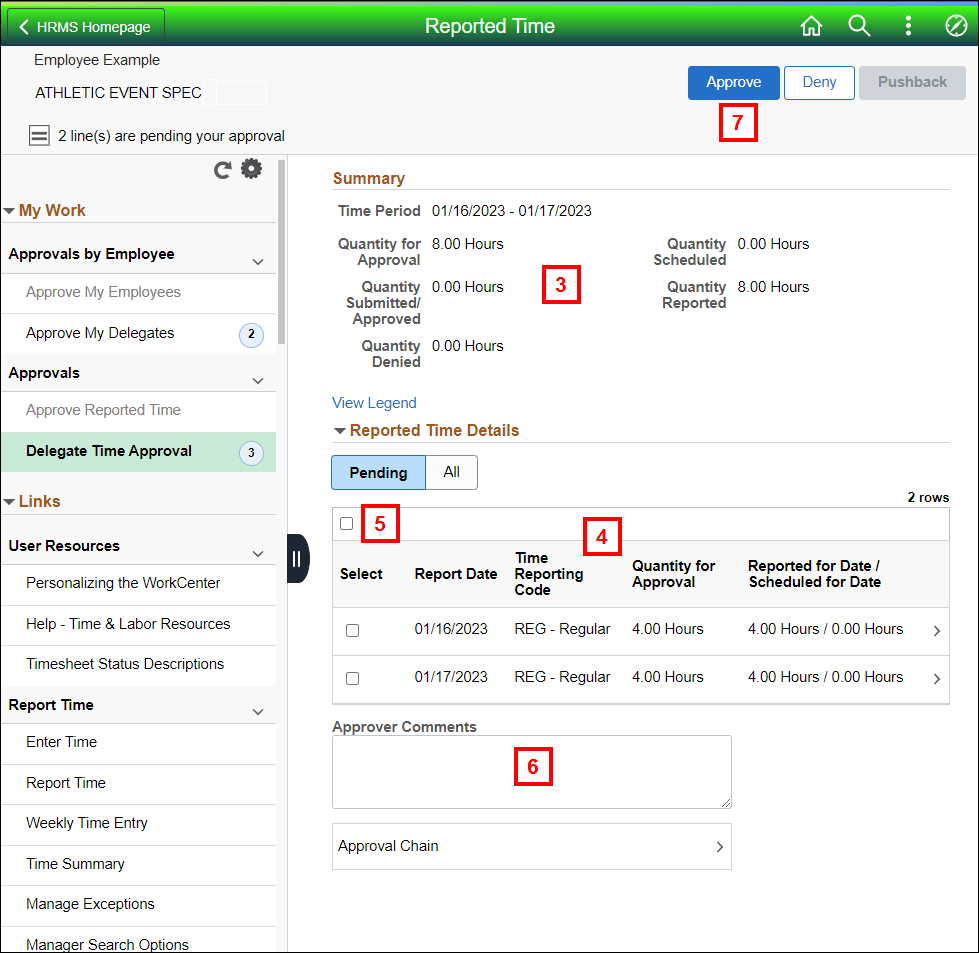
- Review the employee's Summary.
If you are a delegate time approver, click Delegate Time Approval.
Approve Reported Time Screenshot
- Review the employee's Reported Time Details section.
- Check the Select box for each approved row, or click Select All.
- If applicable, add Approver Comments.
- Click Approve.
- Click Yes to confirm the status change.
Approve Reported Time - Enter Time Page
Search for Employees
- Find employee/groups of employees.
- Filter allows you to enter specific filters (Time Reporter Group, Supervisor ID, Employee IDs, etc.) to retrieve employees.
- Get Employees uses the values selected in Manager Search Optoins.
- Click Manage Search Options and enter and save your specific filters so you can skip Filter and click Get Employees to go directly to entering, reviewing and approving time.
- To sort the search results by Name, Title, Exceptions, or Hours to be Approved, click Sort. Otherwise, the system sorts the employees by submit date and time.
- Click the applicable line under the Name/Title column.
- If an employee has more than one Empl Record Number, several rows may display.
Approve an Employee's Punch Times
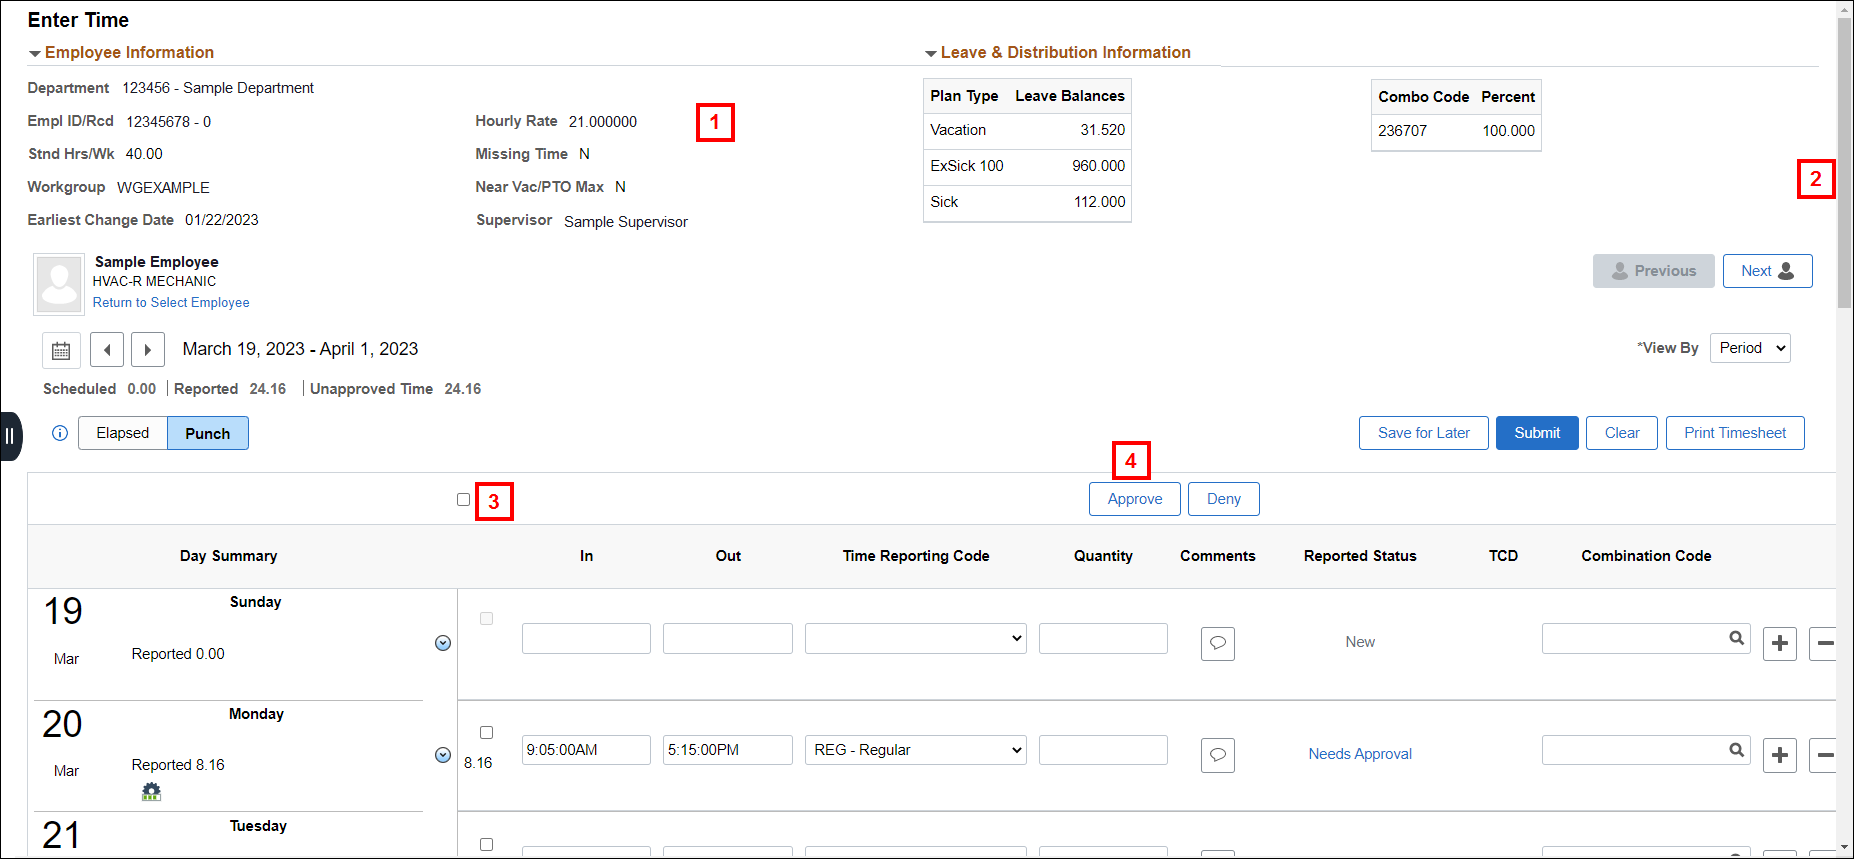
- Review the Employee Information and Leave & Distribution Information section to ensure leave time is not over reported.
- Navigate and view the full Pay Period using the scroll bar.
- Click the checkbox(es) of the punch lines you wish to approve, or check the Select All checkbox (top of the column) to select all the checkboxes of all rows.
- Click Approve.
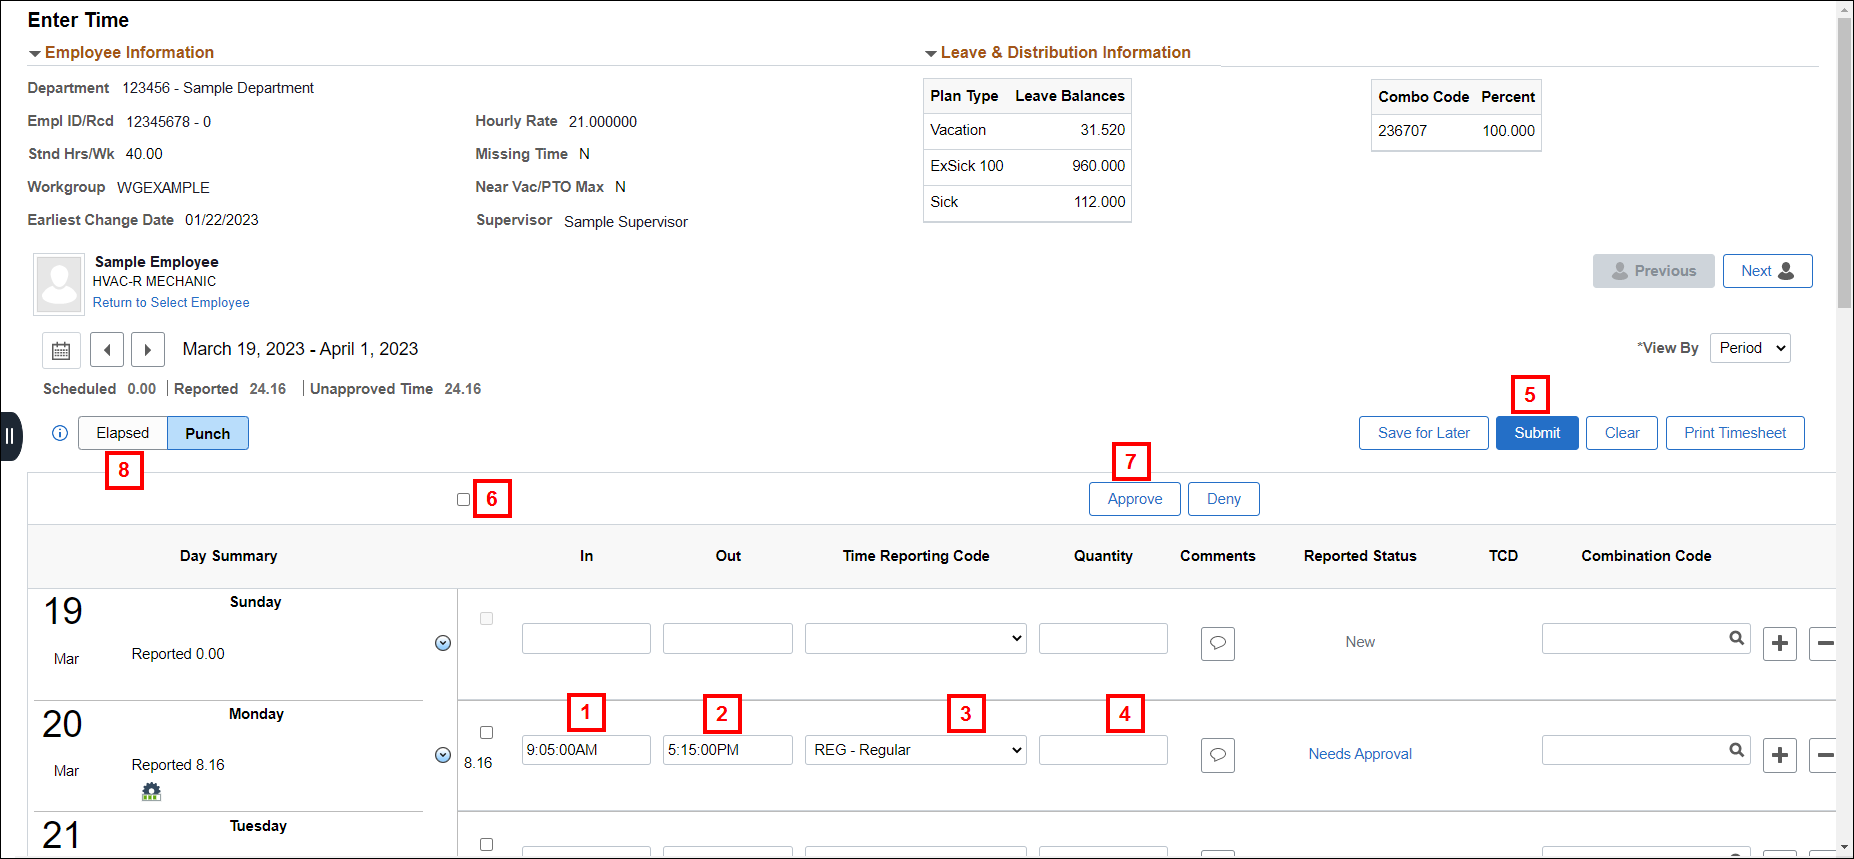
Enter/Edit an Employee's Punches or TRCs
- To change a punch time, overwrite the time with the correct time.
- If the employee forgot or was unable to punch the time clock, enter the missing punch time in the appropriate field.
- Select or change a TRC, if applicable.
- Click Add Comment to enter why the punch needed an edit.
- Click Submit
- Check the checkbox(es) of the updated rows that need approval, or check the Select All checkbox (top of the column) to select the checkboxes of all rows that need approval.
- Click Approve.
- Click Elapsed tab.
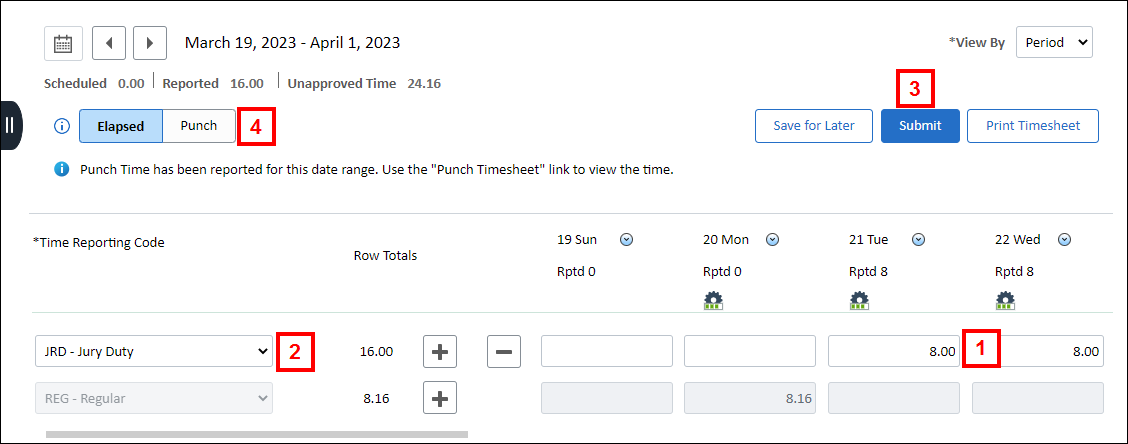
Report Time on the Elapsed Tab
- Type the hours you need to report for a Time Reporting Code (TRC) in the appropriate date fields.
- The Elapsed tab is most useful when reporting multiple days for the same TRC (e.g., a week of paid vacation).
- Type or select the TRC for the hours in the Time Reporting Code field.
- Click Submit
- Click Punch tab to return to the Punch tab in order to approve to approve time for the entire time period. .
Enter Comments
- If you wish to enter a comment for a specific date of time, click Comment button under the specific date.
- Type your comment.
- Click Add Comment.
Approve Non-Punch Time
Note: If a comment was entered successfully, the comment icon in the appropriate date shows text in the Comment bubble.
- Check the checkbox(es) of the reported time rows that need approval, or check Select All checkbox (top of the column) to select the checkboxes of all rows that need approval.
- Click Approve.
- Click Next to approve/report time for the next employee in the static group.