Important Information
- Schedules can be used to streamline the time entry process for timekeepers who regularly enter employees' work schedules on timesheets:
- Assign an employee a schedule that reflects his/her normal work schedule, including shift differential, etc.
- Click the "Apply Schedule" button on the timesheet to load the scheduled hours so they do not have to be entered manually.
- Edit the applied scheduled time as needed.
- M-Pathways automatically assigns each employee a "zero-hour" schedule (D00000) with no workdays or hours.
- Timekeepers who report time directly in M-Pathways should assign each employee a schedule that reflects the workdays, hours, and shift they work.
- Timekeepers who report time directly in M-Pathways may choose to assign/keep the "zero-hour" schedule for:
- employees whose hours, workdays, or shifts are inconsistent
- monthly employees that only have exception time reported
- employees who report their own hours via Employee Self-Service in Wolverine Access
- Work schedules are effective dated, and timekeepers can view an effective-dated history of an employee's schedule assignments.
Navigation
NavBar > Navigator > Manager Self Service >Time Management > Manage Schedules > Assign Work Schedule
Step-by-Step Process
- Enter the Employee ID in the EmplID field.
- Check the Include History box to retrieve all information on the employee.
- Click Search.
- If the search returns a list of multiple Empl Rcd Nbrs for the employee, select the appropriate one.
View Effective-Dated Work Schedule(s)
- Verify the employee's current schedule assignment.
- To determine whether a schedule is assigned by M-Pathways (based on the employee's Workgroup) or assigned by a unit, view the Assignment Method field. Note: The Assignment Method options are:
Assign Work Schedule Screenshot
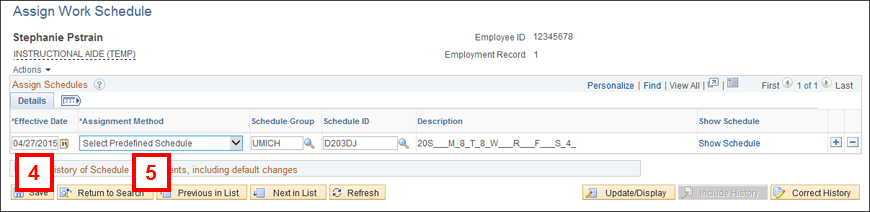
- Use Default Schedule: Assigned by M-Pathways
- Select Predefined Schedule: Assigned by the unit
- Create Personal Schedule: not used by U-M
Assign a Schedule to an Employee
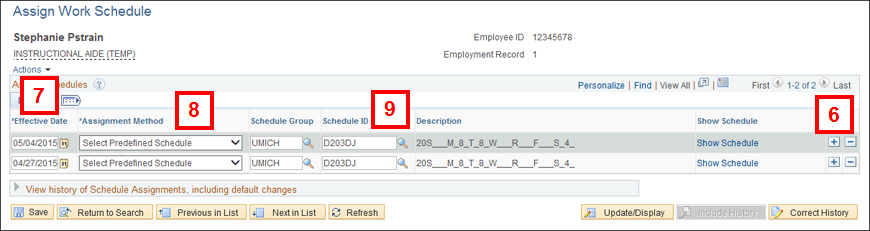
- Click Add a Row
 on the most recent effective-dated row.
 - If applicable, overwrite the default date with the date the new schedule begins, or select it from the calendar in the Effective Date field.
- Verify or select Select Predefined Schedule from the Assignment Method drop-down list.
- Enter or Lookup
 the Schedule ID you want to assign the employee in the Schedule field and skip to step 16.
Assign Work Schedule Screenshot
Lookup a Schedule
- Enter the shift (D, E, N, or M) and total weekly hours for the schedule you want to find in the Schedule ID field. For example, type D40 to lookup all schedules that reflect a 40 hour work week with a day shift attached to each day of the schedule.
Note: D = day, E = evening, N = night, M = mixed (more than one type of shift) - Click Look Up.
- Click the Schedule ID you want to assign to the employee from the Search Results list.
Verify Schedule
- Click Show Schedule in the most recent effective-dated row to ensure you entered/selected an appropriate schedule.
- Review the Schedule Calendar to ensure it is the appropriate schedule.
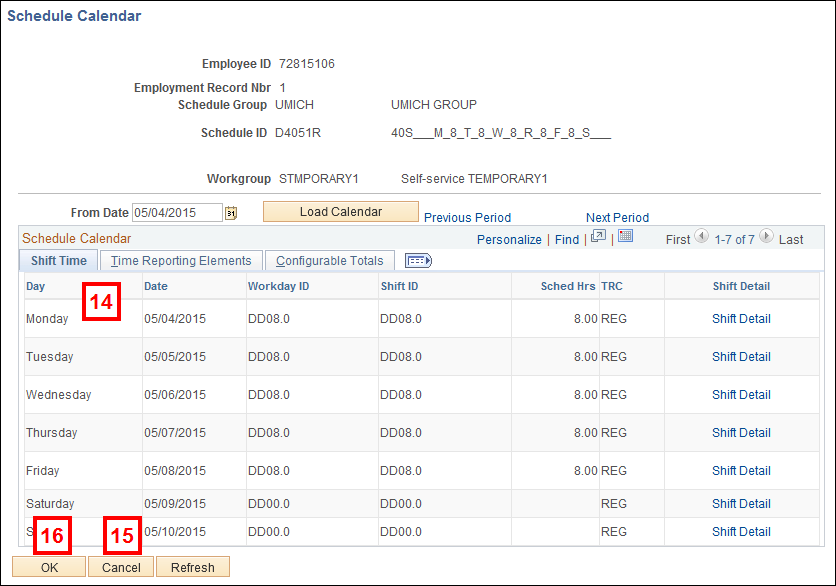
Notes:
- The Time Reporting Codes (TRC) will display based on the shift selected:
- D = Only REG will display
- E = Evening Shift Premium TRC (ESA) and REG will display
- N = Night Shift Premium TRC (NSA) and REG will display
- M = Each of the TRCs (REG, ESA and/or NSA) will display based on the schedule.
- The Schedule Calendar will begin based on the effective date entered. (i.e. 4/9/08 is a Wednesday, therefore the Schedule Calendar will start with Wednesday).
- If the schedule you selected is not the appropriate schedule, click Cancel to return to the Assign Work Schedule page, and enter or Lookup the appropriate Schedule ID (see step 10 for the Lookup Schedule steps).
- Click OK.
- Click Save.
- To assign a work schedule to another employee, click Return to Search.
Delete/Remove a Schedule to an Employee
- Click Add a Row on the most recent effective-dated row.
- If applicable, overwrite the default date with the date the new schedule begins, or select it from the calendar in the Effective Date field.
- Select Use Default Schedule from the Assignment Method drop-down list. OR
- Select Select Predefined Schedule from the Assignment Method drop-down list and enter or Lookup D0000 in the Schedule ID field.
- Click OK.
- Click Save.
- To assign a work schedule to another employee, click Return to Search.