Important Information
- The Group Schedule Assignment process enables timekeepers to assign a work schedule to an ad hoc group assembled with an individual employee(s) and/or a static group(s).
- The Group Schedule Assignment page does not display an employee's schedule assignment.
- If you have an existing Run Control ID for the Group Schedule Assignment process, you may use it. For additional guidelines, refer to the Run Control IDs reference document.
- It is recommended that timekeepers re-use a single Run Control ID for all the individual reports and processes used throughout the overall time reporting process.
Navigation
NavBar > Navigator > Set Up HCM > Product Related > Time and Labor > Schedule Configurations > Assign Schedule to Group
Step-by-Step Process
- Click Search to display your existing Run Control ID(s).
- If applicable, select a Run Control ID from the Search Results list and skip to step 6.
- If a Run Control ID does not display, click Add a New Value.
Add a Run Control ID
- Enter the name of your new Run Control ID in the Run Control ID field.
Note: You can use letters, numbers, and underscores to name a Run Control ID, but you cannot use spaces, dashes, or other non-alphanumeric characters. - Click Add.
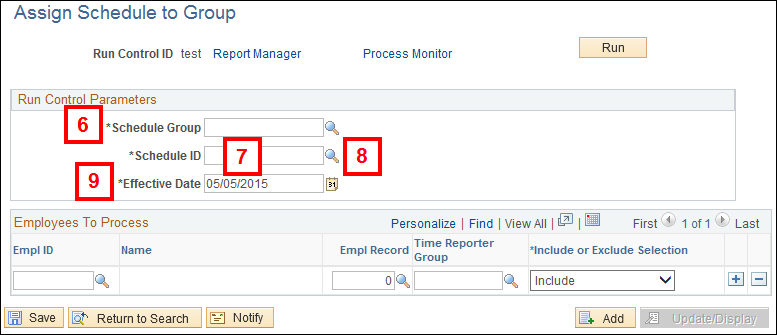
Enter Work Schedule Information
- Enter UMICH in the Schedule Group field.
- Enter the Schedule ID you want to assign to the ad hoc group in the Schedule ID field.
- If you do not know the Schedule ID, click Lookup
 in the Schedule ID field.
 - Enter or select the date from the Calendar on which the schedule begins in the Effective Date field and skip to step 13.
Assign Schedule to Group Screenshot
Lookup a Schedule
- Enter the shift (D, E, N, or M) and total weekly hours for the schedule you want to find in the Schedule ID field. For example, type E40 to lookup all schedules that reflect a 40 hour work week with an evening shift attached to each day of the schedule.
Note: D = day, E = evening, N = night, M = mixed (more than one type of shift) - Click Look Up.
- Click the Schedule ID you want to assign to the group from the Search Results list.
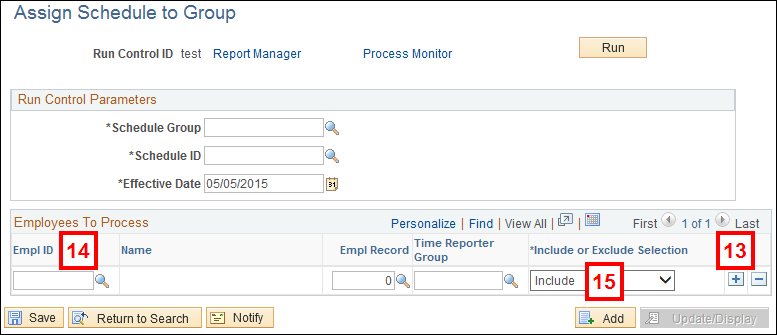
Assemble an Ad Hoc Group - Add an Employee(s)
Note: If you are not adding an employee, skip to step 16.
- If applicable, click Add Row
 for each employee you want to add.
Note: You do not need to click Add Row to enter data in the first row. - Enter the EmplID(s) and Empl Rcd Nbr(s) of each employee in the appropriate fields.
- Verify Include displays in the Include or Exclude Selection field for each employee.
Assign Schedule to Group Screenshot
Assemble an Ad Hoc Group - Add a Static Group
Note: If you are not assigning the schedule to a static group(s), skip to step 21.
- If applicable, click Add Row for each static group you want to add.
- Enter the static group ID in the Time Reporter Group field for each static group.
Assemble an Ad Hoc Group - Exclude an Employee from a Static Group
Note: If you do not want to exclude an employee(s) from an added static group, skip to step 21.
- For each employee in an added static group(s) for whom you DO NOT want to assign the schedule, click Add Row .
- Enter the EmplID and Empl Rcd Nbr of each excluded employee in the appropriate fields of the new row.
- Select Exclude from the Include or Exclude Selection drop-down list for each excluded employee.
Run the Group Schedule Process
- If you have not completely assembled the group to which you are assigning the schedule, you may click Save and return to this page later to continue.
- Once you have assembled a complete group, click Run to initiate the process that assigns the schedule to each employee included in the group.
Note: Clicking Run saves the group you assembled on this page and the Process Scheduler Request page displays. - Verify PSUNX displays in the Server Name field, or select it from the drop-down list.
- Click OK to run the Group Schedule Assignment process.
Note: After you click OK, the Group Schedule Assignment page displays.
Verify Schedule Assignments
Note: To verify this process successfully assigned the schedule to:
- an individual employee, review the employee's schedule assignment on the Assign Work Schedule page (described in the View and Assign a Work Schedule for an Employee procedure).
- the employees in a static group, run the MTL_SCHEDHRS_BY_STATIC_GROUP public query (described in the Run a Public Query procedure available).
- To perform this process for a different group and/or schedule. click Return to Search.
Note: the next time you perform this process, clear the previous group you assembled by clicking Delete Row for each row.