Overview
When you search for forms or other data, that information is displayed in list format. The fields shown in a list differ depending on what information you are accessing. However, the way you interact with the list will be the same. You can search, sort, filter, and edit data in lists.
List Structure
A list is composed of three main parts – title bar, headers and fields.
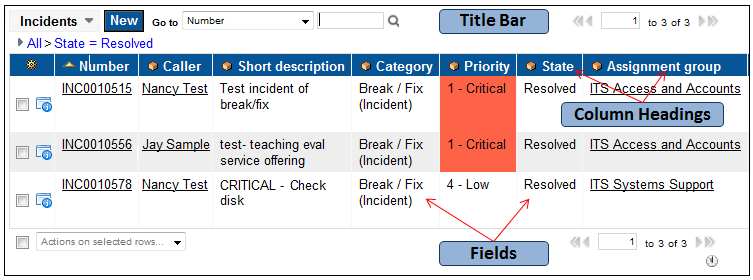
Open a Record - Any field data that is underlined is a link to that record. This allows you to open not only the main incident, request or other application record, but also person and group records.
View Record - The blue View icon is available on each record row. Clicking the icon opens the record. If you move your mouse over the icon, a flyout window displays basic information about the record.
List Title Bar

| Letter | Field/Button | Description |
|---|---|---|
| A | Table Name | The table name indicates the type of data in the list. |
| B | Context Menu | Click the arrow on the table name to view the Context Menu. In the Context Menu you can perform additional actions, including applying filters, grouping results, showing a certain number of results per page, and refreshing the list. |
| C | New | Create a new record within the table. |
| D | Go To | Filter a list by selecting a value from the Go To drop-down list, entering text in the text field, and clicking the magnifying glass icon to search. |
| E | Page Navigation | Go to a specific page in the list or page through the list. |
Breadcrumbs
When you perform a search or open certain modules from the Application Navigator, a string of field data displays under the title bar. This is a Breadcrumb. The breadcrumbs explain how the list was generated using various filters.

In the Basic Breadcrumb image above, the list was filtered by:
- all incident records (All)
- assigned to no individual (Assigned to = )
- with an Active status (Active = true)
- and a Priority of Critical (Priority >= 1 – Critical)
You can edit the search using this breadcrumb, rather than building a new search from scratch. This can be done in one of two ways:
Click a field in the breadcrumb to remove all of the criteria after that field. In the Basic Breadcrumb image above, clicking Active = true removes the Priority filter and refreshes the search. You can then use the Go To menu in the title bar to add another filter, if needed.
Clicking the > removes only the filter after the >. In the above example, if you clicked the > after Assigned To = it would remove the Active = true filter and keep the Priority >= 1 – Critical filter.
- Expand the breadcrumb by clicking the Show Filter arrow.
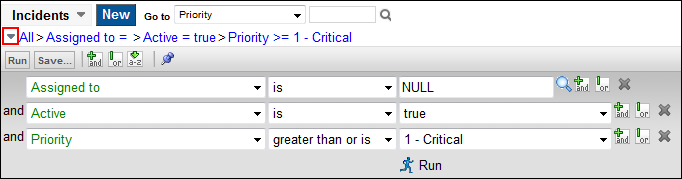
The expanded breadcrumb gives you increased options for editing your filter. Delete a filter by clicking the X next to its row. Add a filter using the Add AND Condition or Add OR Filter buttons. The A-Z button adds a sorting option to the list. After you have built the filter you can click Run to perform the search, or click Save to save the filter to your profile.
Customizing Lists
In a list, the fields displayed, sorting, and order of columns are customizable. When you customize a list, that customization applies to all lists within that application. For example, if you customize an Incident list, then perform a new Incident search, the list would display in the customized format, but if you performed a Request search, the list would not show in the customized format.
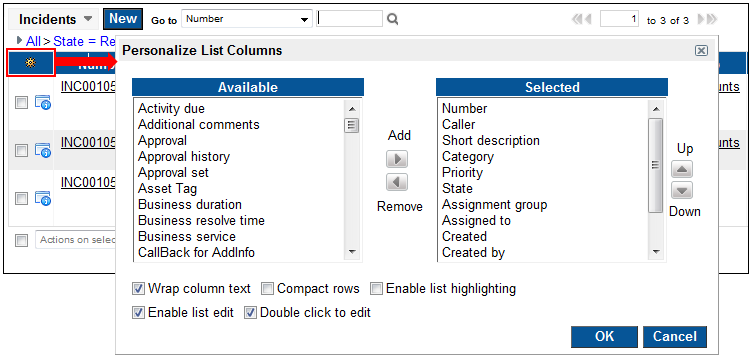
Click the Personalize List button in the upper left corner of a list to open the Personalize List Columns window. Personalize the list using these options:
- Add/Remove Fields - Fields in the Selected column are currently displayed in your list. To add a field to the list, select it in the Available column, then click the Add button. To remove a field, select it in the Selected column and click the Remove button.
- Sort Columns - The Selected column shows the order in which the fields display in your list. To move a column, select it and click the Up or Down button until it is in the correct position.
- Other Options - The boxes at the bottom of the window can be checked or unchecked depending on your preference.
List Context Menus
When working with a list, there are two contextual menus available to help you manage your list.
Title Bar Contextual Menu – Right-click on a heading in the list title bar to bring up the contextual menu. This menu allows you to:
- sort the list based on the header
- group results by the values in that column
- display data in either a pie or bar chart
- export the list in an Excel, CSV or PDF format
Field Contextual Menu – Right-click on a field in the list to bring up the contextual menu. This menu allows you to:
- show matching values; filter the list to only those rows with the same field value as the selected field
- filter out values; filter the list to remove any row that has the same field value as the selected field
- copy the record URL to the clipboard so it can be pasted into another application, like an email
- assign a label to the row to link the record to a custom application label
- assign the record to yourself