Important Information
Use your UMICH uniqname and Kerberos password to log in to ServiceLink. Reminder: An Incident Request is a Significant Incident if the ticket is a Priority 1 and has bot been resolved within an hour.
Navigation
ServiceLink> Incident Application > Create New
Step-by-Step Process
- Click Create New. Users can also click New in the Incident List to create a new Incident.
- Type the uniqname or full name of the customer in the Caller field. Adding an "@" after the uniqname will aid in faster data entry.
NOTE : All required fields are marked with the red asterisk next to the field. The Uniqname field is a read only and will automatically populate after the Caller is identified.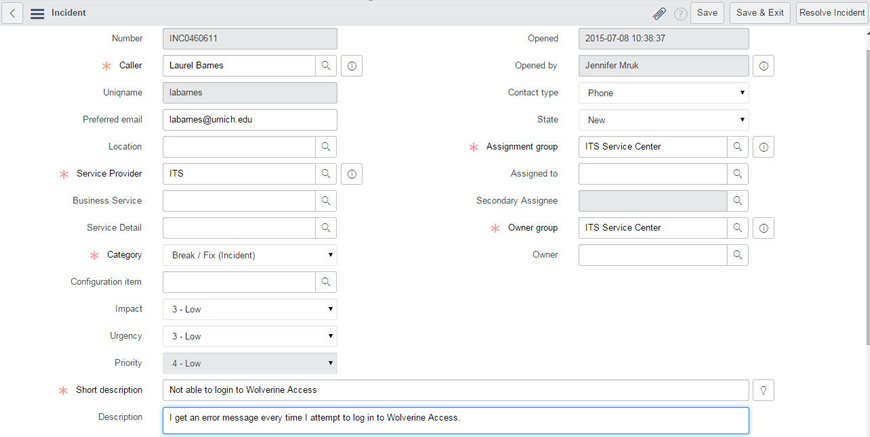
- Type a different email address in the Preferred email field if you'd like to receive communications regarding this incident at an email besides your umich.edu email, which is the default for this field.
- Type the caller's location or use the search icon to find appropriate location. Users cannot search by acronym.
- Lookup
 to choose the appropriate Service Provider.
 - Choose the Business Service and Service Detail as applicable.
- Choose the appropriate Category from the Category drop-down.
- Veryify Impact and Urgency should both default to Low. Update if applicable. Impact refers to the number of users affected by the issue.
NOTE: Refer to the Incident Management Service Restoration Definitions for more information. - Type a summary of the issue in the Short Description field.
- Type as much information as possible in the Description field.
- Indicate what method was used to report the incident through the Contact Type drop-down menu.
- Assign the incident to the applicable Assignment Group.
- Verify the Owner group, which automatically populates once the Service Provider is identified.
- Click Save to submit this ticket. Click Save and Exit to close the ticket and be taken back to the Open Incident screen.
NOTE: Upon saving the incident, an email notification will be sent to the user notifying them that a ticket has been opened on their behalf. The email is already formated with standard language.