Overview
The first part of the Survey Excel Interface Process, which provides an option to update Space Management data via an upload into M-Pathways, is to export the current data into a data file.
Survey Excel Interface Process
The Survey Export process generates a data file that is viewed using the Survey Excel Template. The template enables you to review all the space data (e.g., survey data through features) for a large group of rooms.
- You can only export data for rooms to which you have access as a survey user.
- The data exported is the Survey Data, as opposed to
Official
Data. - After you generate the data file, save it to your local network. Otherwise, you will not be able to use it to populate the Survey Excel Template.
Navigation
NavBar > Navigator > Space Management > Survey > Excel Interface > Survey Export
Step-by-Step Process
- Click Search and select your Run Control ID from the list.
OR
Enter your Run Control ID and click Search.
OR
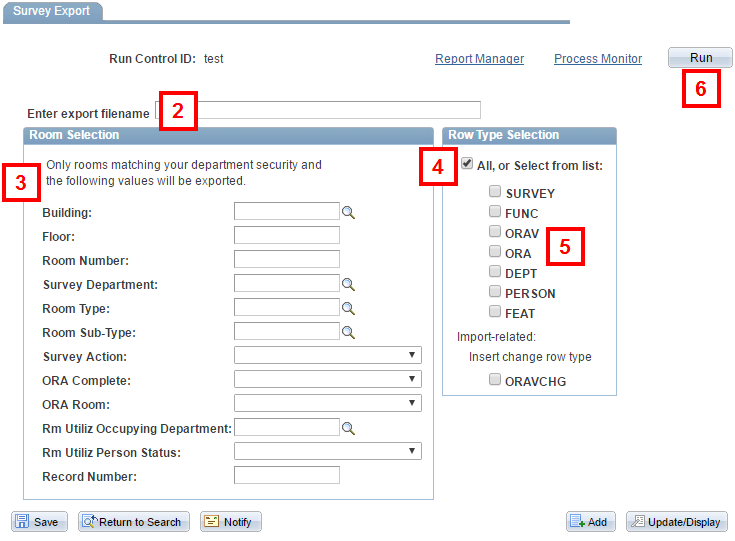
If you do not have a Run Control ID, click the Add a New Value tab, enter a new Run Control ID (no spaces), and click Add. - Enter a file name for the Survey Export file in the Enter export filename field using the following format: Filename_DeptID_date.
E.g., ExporttoExcel_231640_092012 - Enter or select values in one or more of the fields in the Room Selection group box to specify the data to be exported.
- Check the box for each type of room data to be exported in the Row Type Selection group box.
OR
Check the All box. - (Optional) If you are using the Survey Excel Interface Process to verify Organized Research Activity (ORA) data during the space survey period, check the ORA, ORAV and ORAVCHG boxes. All ORA data is required for the verification process.
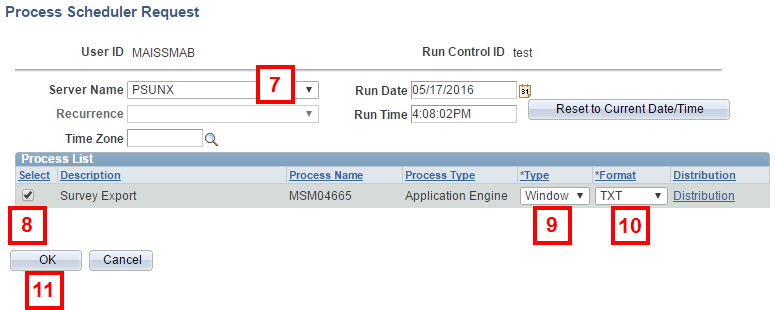
- Click Run to open the Process Scheduler Request page.
- Select PSUNX from the Server Name drop-down list.
- If applicable, check the Select box.
- Select Window from the Type drop-down list.
- Select TXT from the Format drop-down list.
- Click OK to run the process.
- Right-click the applicable file Name.
- Select Save Target As… from the pop-up menu.
- Save the file.
Note: SURVEY row types are required.
Note: ORAV and ORAVCHG rows do not display if the Hide ORA Verify Complete box is checked on the Departments page for the room.
Process Scheduler Request Page Screenshot
The data file does not open automatically. Instead, the Report Detail page opens, with a list of linked files.