Overview
The second part of the Survey Excel Interface Process is to populate the Survey Excel Template with the exported data in order to view the information and/or enter changes to the room data.
Survey Excel Interface Process
- Survey Export
- Use the Survey Excel Template
- Import Space Data into M-Pathways
Download the Survey Excel Template from the Space Management website. The template can be found under the Space Survey section.
Note: The template is color-coded to help you identify the type of data (e.g., Survey, ORA, or Department). Refer to Survey Excel Template Overview and Field Descriptions for more information about color-coding, Row Types, and Columns.
This document is divided into the following sections:
Populate the Space Management Survey Template
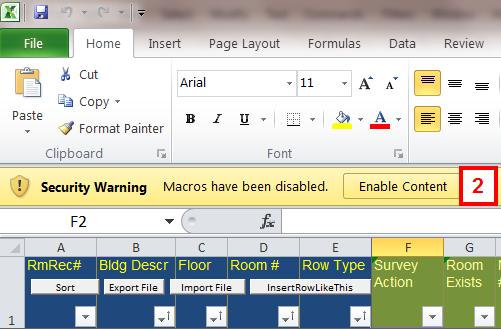
The template contains macros. To enable the macros you must open the template file from within Excel. You should only need to do this once.
- Open the saved template in Excel.
- Click Enable Content.
- Click Yes.
- Click Import File.
- Browse for and select the XML data file.
- Click OK in the
Are you sure?
dialog box. - A parent survey department, or
- >4,000 rooms and all Row Type Selection (e.g., Survey) options
Locked
by another user- Empty (i.e., 0KB)
- Too large (e.g., more than 6,000 rooms)
Survey Excel Template Screenshot
On average, the import process takes minutes to complete. The larger the data file, the more time it takes. For example, it will take longer if you selected:
Note: You may receive a system error when the data file is:
Fix the problem and import again.
The data you exported from M-Pathways is now populated in the Excel Survey Template.
Notes:
- The room data displays in the order of the export parameters.
- If you selected All, for each room you will see a Survey row followed by the Func, ORAV, ORA, Dept, Person, and Feat rows if that data exists for the room.
If your objective is to update space data for these rooms, go to the Specify Changes to Space Data section of this procedure.
Specify Changes to Space Data
This procedure assumes that you are familiar with the data fields associated with each of the M-Pathways Space Survey pages (i.e., Survey Data, Organized Research Activity, Room Utilization and Features) and how to manually add or update survey and room data on these pages. It doesn’t describe every field and row type in the template. The following demonstrates how to use the Space Management Survey Template to make additions/updates to your survey and room data.
Important Information
- Except to indicate deletions via a Deletion column, DO NOT modify or delete the existing data (i.e., the data on the SURVEY, ORA, ORAV, FUNC, DEPT, and PERSON rows) to specify changes. To change data, use the Insert Row Like This function in the template. After inserting the associated row, you indicate the change on the
change row
. Directly updating existing data results in errors during the Survey Import process. - For some row types (e.g., FUNC), using the Chg Pct button automatically marks the existing row for deletion. Refer to Data Entry & Tips by Row Type for more information.
- The template contains columns for fields that are only used by specific departments in M-Pathways (e.g., Survey Action and Provost columns in the Survey Row Type are only used by the Office of Space Analysis). The template doesn’t prohibit data entry in these cells, but you will receive permission/security errors when you try to upload the information into M-Pathways if you don’t have access. When errors occur in the upload process, no changes (valid or invalid) listed on the template are accepted by M-Pathways.
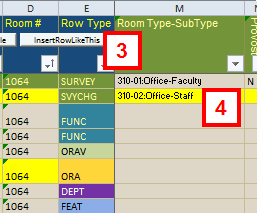
Using the Insert Row Like This Function
The first five columns (A – E) are static (i.e., always appear even when you scroll). They display the M-Pathways room record information and the Type of data for the row (e.g., SURVEY). To update data you must use the Insert Row Like This function to insert a blank row for the selected row. The room record data copies down with a Row Type value that has a format of TypeCHG
(e.g. SVYCHG) or Type+
(e.g., ORA+) depending on the functionality within the row. This row, highlighted in yellow, is the change row
where you make the edits to the data.
- Put your cursor in a cell within the Row Type you wish to change.
- Click InsertRowLikeThis in the upper left section of the template (across columns D and E).
- Enter the data for the change in the applicable cell(s) of the spreadsheet.
- Only enter the data that is changing. Do not copy values from the original row if the value hasn’t changed.
- If you are making changes to more than one Type of data associated with a room, you must insert a row for each type.
Survey Excel Template Screenshot

Notes:
Insert a New Row Type
You can also use the Survey Excel Interface Process to enter a new Row Type for a room.
Survey Excel Template Screenshot
- Put your cursor in a cell within a Row Type (e.g. DEPT).
- Click InsertRowLikeThis.
- In the Row Type field for the new
change row
, overwrite the default value (DEPT+) with the Row Type value for the row you wish to add (e.g., PERSON+). - Enter the applicable data for the change row.
Note: The Row Type value you enter must use the change row
format (e.g., TypeCHG
for a Survey row or Type+
for a survey component, such as Person.
Data Entry & Tips by Row Type
Data entry requirements in the template are the same as manual data entry in the Space Management system. Some updates (e.g., changing a Room Function percentage) require both a deletion and an insertion of a change row.
Unless specified below, to delete room data, type or select X in the Delete column for the section.
Basic actions (e.g. deletion of data or inserting a row to add data) are not included in each section below unless additional steps are required to complete the action.
SURVEY Row Type (columns F- P, olive green)
Use drop-down lists where available (e.g., Room Type-Sub Type) to ensure that proper codes, etc. are entered.
Do not delete a SURVEY row. Instead, insert a row and enter or select No
in the Room Exists column and then either enter a Survey Comment or update the Room Type-Sub Type.
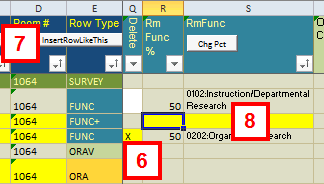
FUNC Row Type (columns Q-S, dark aqua)
Changing Rm Func %:
- Select the Rm Func% cell.
- Click Chg Pct.
- Enter the updated percent.
- Click InsertRowLikeThis.
- Enter the Rm Func %.
- Select the RmFunc from the drop-down list.
Survey Excel Template Screenshot
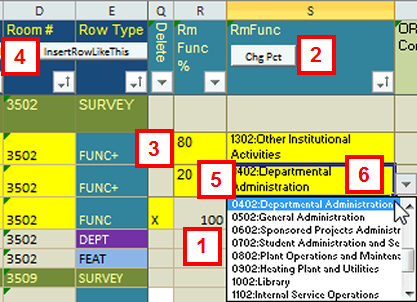
Note: The template inserts a FUNC+ row and marks the FUNC row for deletion.
The Rm Func % must equal 100%.
ORA Row Type (columns U-AB, gold)
When adding an ORA project/grant, the system will automatically apply the values for columns W – AB based on the project/grant value upon import. These values do not default into the template nor do you need to enter them.
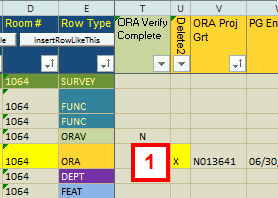
Changing a Room from ORA to Non-ORA
This action requires data entry in three sections of the template: ORA, SURVEY, and FUNC Row Types.
- Enter or select an X in the Delete column for each ORA row associated with the room.
- Scroll left to display the survey data (columns F- P) and place your cursor in the Room Type-Sub Type field with a value of 250 or 310.
- Click InsertRowLikeThis.
- Select the applicable Room Type-Sub Type value from the drop-down list in the SVYCHG row.
- Scroll right to the FUNC columns (Q –S) and place your cursor in the RmFunc field with a value of 0202.
- Enter or select an X in the Delete column.
- Click InsertRowLikeThis.
- Enter RM Func % and Rm Func values as applicable.
Survey Excel Template Screenshot
Survey Excel Template Screenshot
Survey Excel Template Screenshot
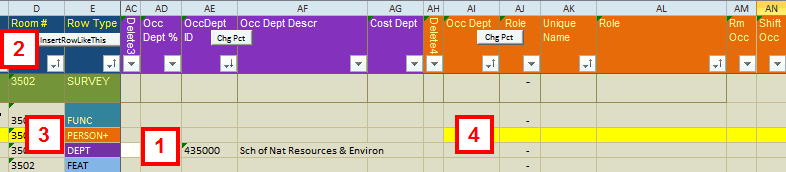
DEPT (columns AD-AG, purple) & PERSON (columns AH-AN, orange) Row Types
These two sections are often utilized together to identify who
(i.e., department and person) occupies a room. PERSON Role % values equal the Occupying Dept % for each room. The steps to update the percent fields in these sections are the similar to those in FUNC section above.
- When changing percent values, the template automatically marks the existing row for deletion and inserts a change row with the same data showing. Adjust the data in the change row as applicable.
- For the DEPT+ row, the Cost DeptID field defaults to the Occupying Dept ID value when changing Occ Dept %. Update the Cost DeptID value if applicable.
Generate the Data File for Import to M-Pathways
After you complete the changes in the template, the next step is to create the XML data file that is used to upload the information into M-Pathways.
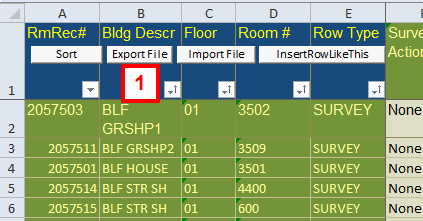
- Click Export File (under Column B).
- Save the file.
- The template’s Export File function automatically assigns a file name of svy_fromExcel.xml to the data file. This name distinguishes it from the export file you created as the first step in the Survey Excel Interface Process.
- Tip: Add a date to the default file name (e.g., svy_fromExcel_092712) to distinguish this file from others.
Survey Excel Template Screenshot
Notes:
Tips for Working with the Survey Excel Template
The following options can help you when you’re using the template as a spreadsheet to view and analyze your space data.
Sorting the Template
Survey Excel Template Screenshot
If you rearranged the spreadsheet data for analysis, click the Sort button (under column A) to return it to its original order.
Excel Features
There are two Excel features that can assist you when searching for specific data within the template.
Find & Select
Survey Excel Template Screenshot
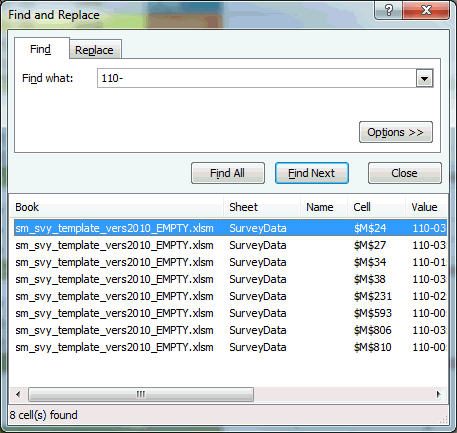
Use to locate all places (i.e., by row and column) within the template that a particular value or partial value occurs. E.g., to locate the rows containing classroom data (all types) enter a Find what value of 110- and click Find All.
This feature can help you navigate to a particular row of data.
Filter
Survey Excel Template Screenshot
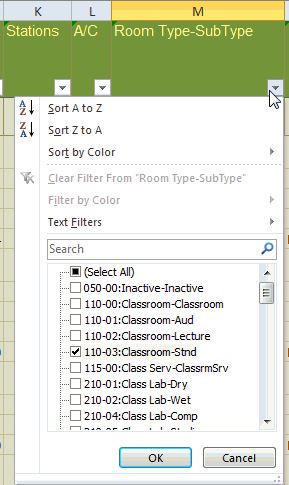
Use to display only those rows that contain a particular value in the template. E.g., filter on the Room Type-Sub Type value of 110-03 to show only the rooms marked as Classroom-Stnd in the spreadsheet.
This feature allows you to view a sub-set of all the data within the spreadsheet, but includes the all survey and room data for that row.
In the template, click the arrow in the column heading to display the values related to the column. By default, the Select All option is checked. To select a particular value, uncheck Select All, click the desired value, then click OK.