Overview
M-marketsite is a shopping website containing catalogs for some U-M strategic suppliers. This site is integrated with M-Pathways eProcurement (ePro). This procedure demonstrates:
- Linking to M-marketsite from ePro.
- Using the Search field to search for and select an item from a hosted supplier.
- Completing the ePro requisition in M-Pathways.
Within M-marketsite you will find hosted suppliers and punch-out suppliers. A hosted supplier provides their catalog directly in M-marketsite. A punch-out supplier provides a link in M-marketsite to a catalog on their website. See the Punch-out section of this procedure to learn about ordering from a punch-out supplier.
Important Information
- This procedure assumes you have entered a ShortCode and Ship To address in your M-marketsite profile. See Setting Up Your M-marketsite User Profile to learn how to set these require values as defaults for your M-marketsite orders.
- Do not use your Web browser’s Back button to navigate within M-Pathways or M-marketsite. Instead, use the links, tabs, or breadcrumb trails in the M-Pathways and M-marketsite pages to return to previous pages.
Navigation
Homepage: Purchasing and Payments; Tile: Create Requisition
Step-by-Step Process
- Click Web Suppliers.
Create Requisition Page Screenshot
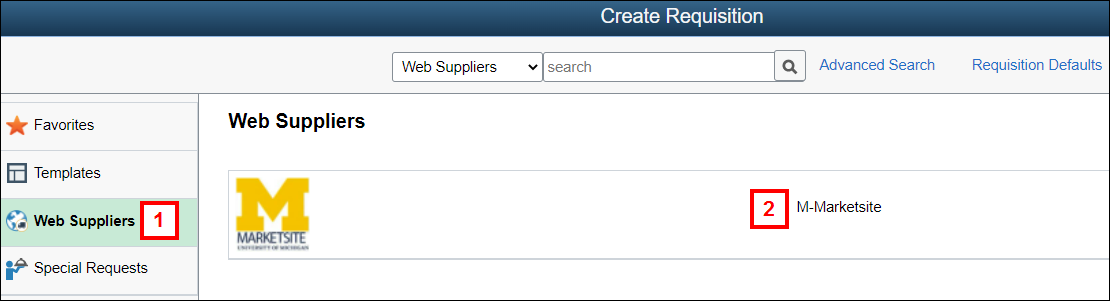
- Click M-Marketsite.
- Enter one or more search words in the Search field. Examples of search criteria include:
- Product Description (e.g., gloves)
- Product Name (e.g., microroughin latex exam gloves)
- Part Number (SKU#) (e.g., 1120.10)
Note: The Search field only searches the Hosted Catalogs.
Marketsite Home Page Screenshot

- Click Search .
Search Options (see M-marketsite Overview and Features for further information):
- To use multiple keywords in the Search field, separate each word with a space.
- To search by a partial value, click Advanced Search.
- To search by the exact part number (SKU#), click Quick Order.
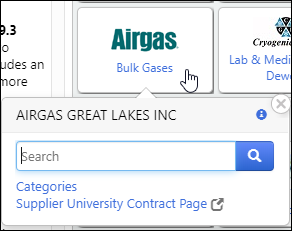
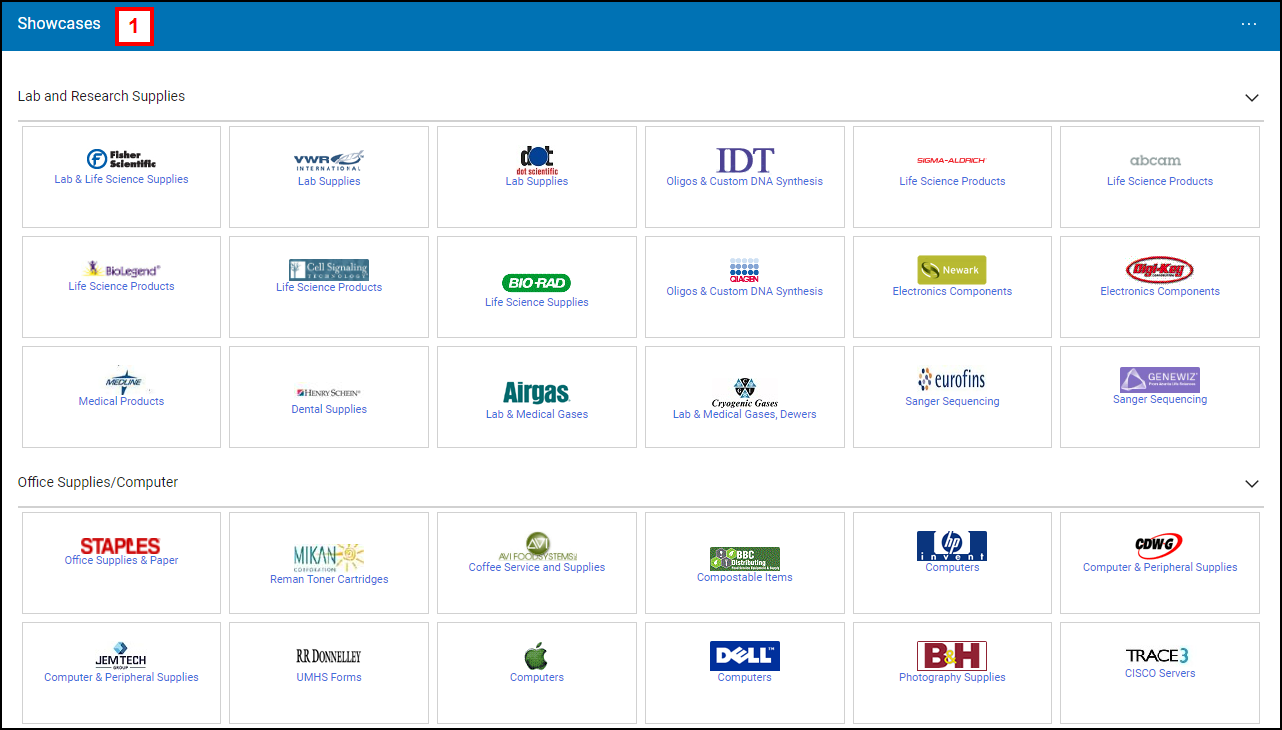
- If you know the supplier for a particular item, click the supplier button in the Showcases group box, and enter a value in the pop-up Search field.
Hosted Catalog Pop-Up Screenshot
- Scroll down if necessary to view all the items on the first page of search results.
Tip: Use the Sort by field or page navigation tools to review search results.Search Results Page Screenshot
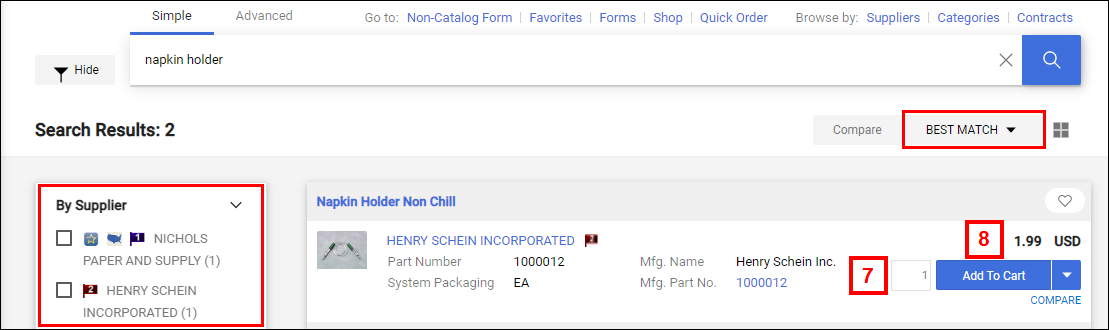
- Locate the desired item in the Search Results list.
Tip: The Filter Results box lists the suppliers with items matching your search criterion and provides options to refine the search results. - If applicable, change the amount to order in the quantity field to the left of the Add to Cart button.
- Click Add to Cart for the desired item.
Note: Verify that the 1 item added message appears. The message always indicates that one item was added, even if you added multiple items. When you review the cart later in this procedure, you can verify that the correct quantity was added. - Repeat steps 3-8 for to add additonal items to your cart.
- After you have added all the necessary items to your cart, click the Cart.
M-marketsite Home/Shop Page Screenshot
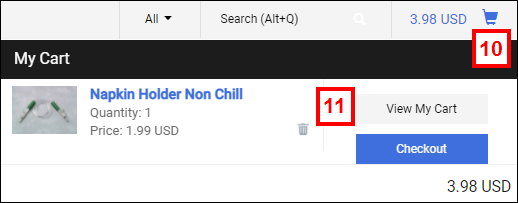
- Click View My Cart.
- If applicable, use the Shopping Cart page to:
- Change the cart name.
- Print the cart.
- Move items to another cart, add items to a draft cart or pending PR/PO, add items to favorites, or remove items. Check the Actions for... box for one or more cart items and use the drop-down list to perform the desired action.
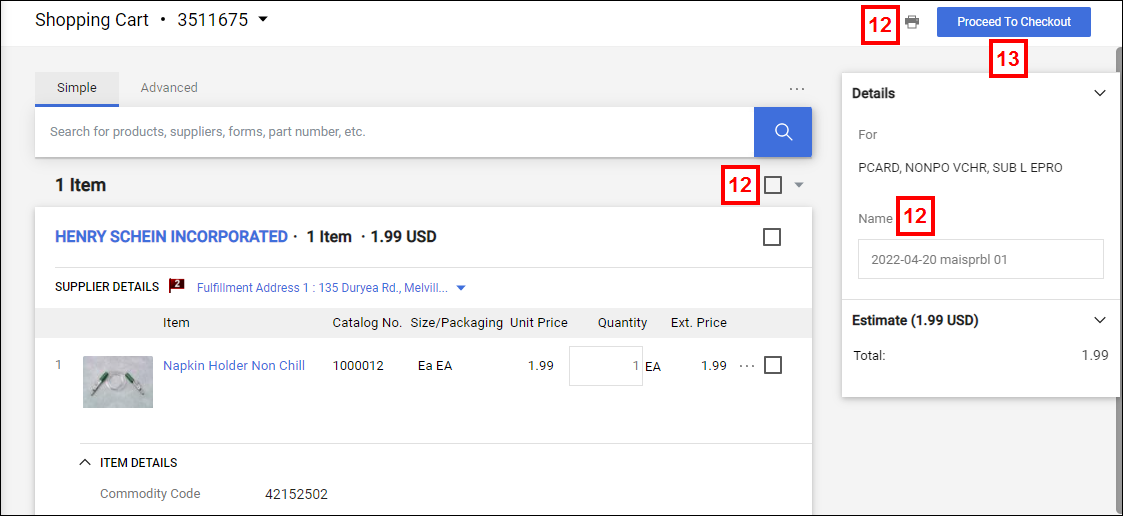
- A future cart/requisition number appears at the top of the Carts page. This number is applied to draft and assigned carts and allows you to obtain a reference number to search for carts in M-marketsite. It is NOT the requisition number created in M-Pathways.
- The cart name defaults to today’s date and your uniqname.
- Click Proceed to Checkout.
- Review the values that default from your profile and cart OR
Click Edit (where applicable)
to open a window on the page to add/change the values for:
(where applicable)
to open a window on the page to add/change the values for:
- General – to change the Cart Name.
- Codes – to change the Shortcode and/or Dept Ref #.
- Ship To – to edit the delivery location.
- Supplier/Line Item Details – to change the order quantity.
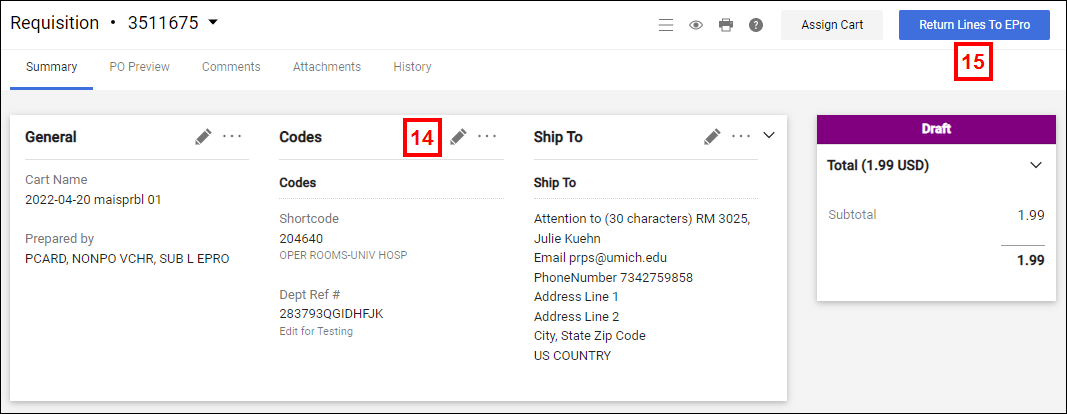
- Click Return Lines to ePro.
Note: You cannot return to M-marketsite to add additional lines to the order after you click Return Lines to ePro.
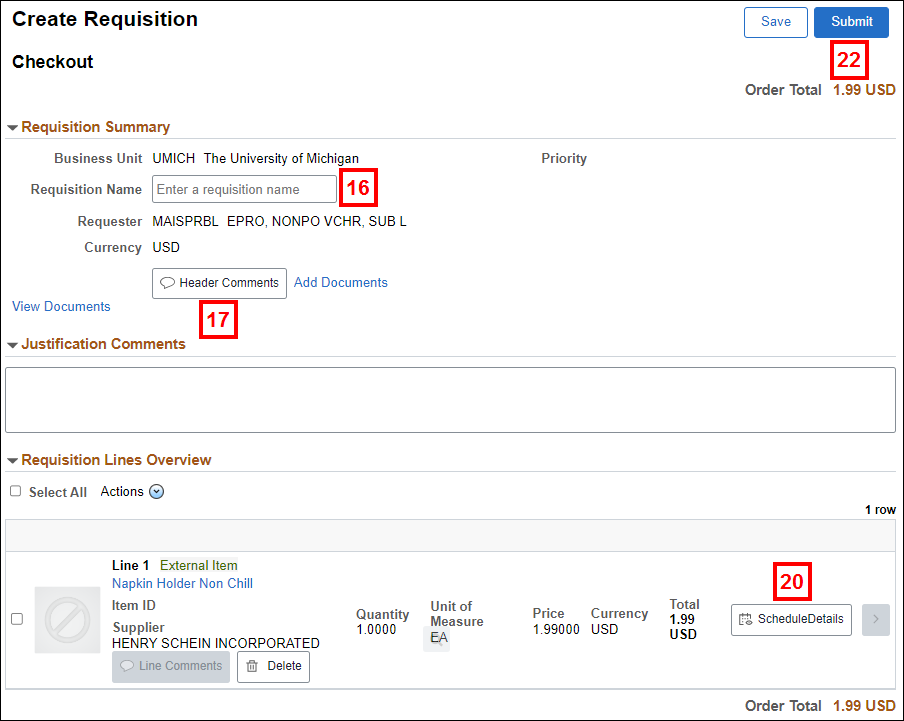
Steps 16-19 are optional. You may use these steps on a case-by-case basis.
- Enter a Requisition Name for your requisition. If you do not, the system names your requisition with the requisition number.
- Click Header Comments to enter comments related to the entire order.
Note: Comments entered are for internal purposes only. The comments are not sent to the supplier unless you check the box to do so. - Enter the Comment Text.
- Click Done.
- Click Schedule Details to review or modify the accounting line information (i.e., ChartFields) for a line. See Change ChartFields or Split Distributions on an M-marketsite Order for instructions.
- Click Done on the Requsition Line Details page.
- Click Submit.
- Click Check Budget.
Notes:- Budget checking assures that a corresponding budget line exists for the ChartField combination(s) in the req and that the req is eligible to be built into a PO.
- For reqs requiring approval(s), the Budget Status must be Valid before it can be approved.
- If Error appears as the Budget Status, click the link to learn more and resolve the error. For help, refer to Resolve Budget Check Errors for eProcurement Transactions.
- If the budget check process is successful (i.e., Valid status), the Check Budget button disappears from the page.
- When an M-marketsite ePro req under $25,000 is submitted, the Status changes to Approved. ePro reqs requiring approval are submitted in Pending status.
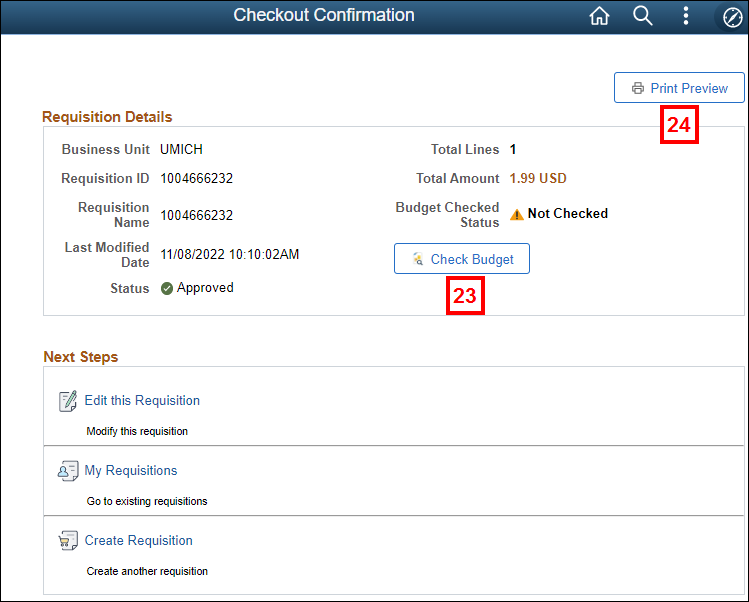
- Click Print Preview to display the requisition in a separate browser window.
- Click Print in the browser window to print a hard copy for your records.
- Click Close to exit the Requisition window.
Note: After closing the View Printable Version page, perform one of the following actions to leave the transaction:
- Click My Requisitions or Create Requisition.
- Select another Menu option.
- Click Home in the M-Pathways banner.
- Sign out of the system.
Edit a Ship To Address
If you clicked Edit in the Ship To column for step 13, complete the steps below.
- Edit current shipping address:
Keep the current Ship To but modify the Attention to, Email, and Phone Number as needed by clicking Edit on the address line. Check the Add to my addresses box, if applicable. Click Save Changes.
Notes:- You will be asked to name this address and specify if you would like to make this the default address in the future.
- The Attention to field format is <RM # Name> of the person receiving the delivery.
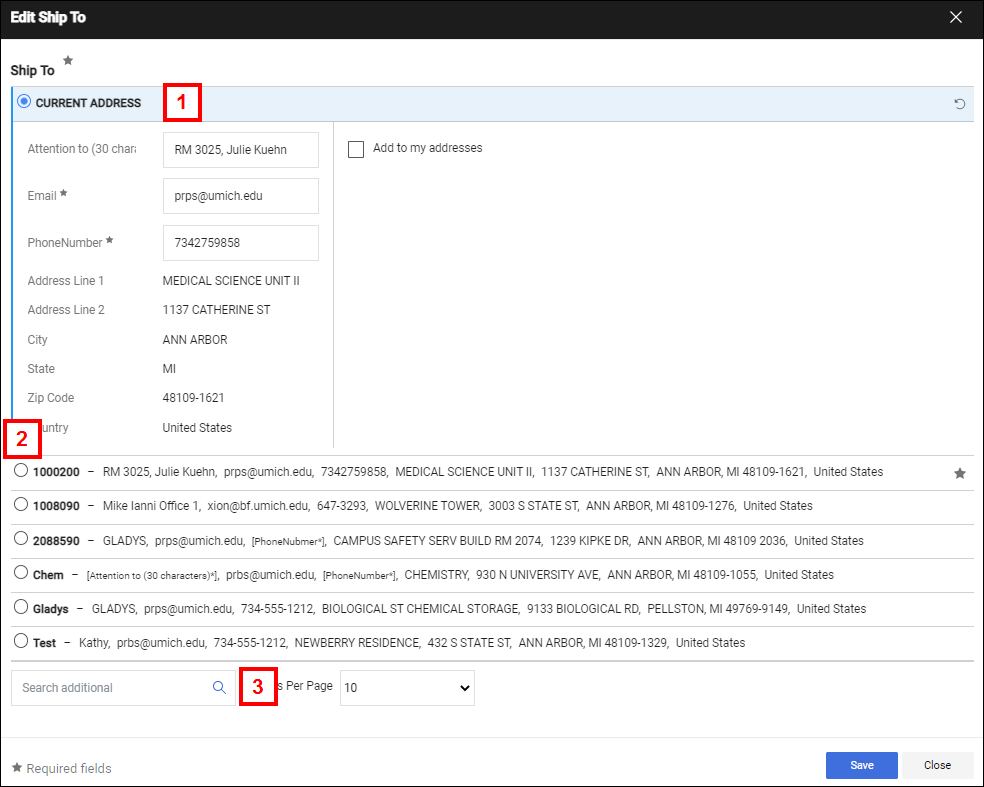
- Or choose from your addresses: Select an address from your M-marketsite profile by clicking the applicable radio button.
- Or select a new address:
- Enter values in the Search additonal field (e.g., Location Code or Address Name), then click Search . Partial values may be used with an asterisk (e.g., medical*) to conduct the search.
- Click the radio button for the desired address.
- Update the Attention to, Email, and Phone Number as needed by clicking Edit on the address line.
- If desired, check Add to my addresses.
- Then click
 .
.
The selected Location Code updates the Address Details field in the Ship To section of the Final Review page.
Ordering from an M-marketsite Punch-out Supplier
The steps to order from a Punch-out supplier in M-marketsite are mostly the same as the procedure above. The differences occur in searching for and selecting items from the Punch-out supplier’s website. Each supplier’s website is different. However, each provides the ability to:
- Cancel the punch-out and return to M-marketsite without saving the order.
- Select item(s) for your M-marketsite shopping cart.
- Check out of the supplier’s website to return to M-marketsite to complete the order.
The Punch-out supplier buttons in the Showcases group box are links to the supplier’s website. Supplier buttons are organized by Category (e.g., Office/Computer).
If an item from a punch-out supplier matches your search criteria, an Order from Supplier link appears in the Search Results list to go to that supplier's website.
- From M-marketsite, click a supplier button to go to that supplier’s website.
M-marketsite Home/Shop Page Screenshot
- Use the supplier’s website functionality to:
- View catalog items
- Select items for your shopping cart
- Checkout to M-marketsite.
- Follow steps 9 – 20 above to complete the ePro req for your M-marketsite order.